BBSW-rules

Bloody Barons Sumerian Wars

.

This post will provide the rules adjustments I’ll be making to use with Peter Pig’s Bloody Barons rules – Bloody Barons Sumerian Wars (BBSW).

The rules below are not final as any further playtesting will inevitably cause a rethink or tweak if it is required, but they do form the basis upon which I’m going to adapt Bloody Barons (BB) to the Sumerian Wars period. A number of ideas are directly taken from DASAQ but many other ideas are my own or knicked from one or two other sources. I have included the pre game events tables here for completeness as they are used together with the other rules when preparing for play using BBSW.

Where appropriate I’ve expanded some notes on my ideas for the rules and the reason for them so you can see where it is I am coming from with the concepts involved. The following rules amend or add to the existing Bloody Barons rules. All adjustments are shown on the playsheet.

It is important to note that we do not know with confidence the tactical certainties of how the Sumerians commanded their troops in battle and the tactical interactions of the various troop types. To create what I believe is a plausible tactical model for use with BB I have used my knowledge of similar formations of later times which were equipped with similar weapons systems, along with what known information I have on the period – this is not a precise science. Other people may share a different view of how these battles were fought and it is hoped my ideas and suggestions provide food for thought when constructing their own tactical model at the very least – use what you like, discard the rest.

I’ve included an integrated quick reference sheet based on the original Bloody Barons playsheet for use during play specifically tailored for BBSW so no reference is required between BB and my rules during play. The rules and playsheet can be downloaded for convenience.


Rules


RULES FOR BLOODY BARONS – SUMERIAN WARS CONVERSION v.1.0
The following rules amend or add to the existing Bloody Barons rules. All adjustments are shown on the playsheet.

Troop Ratings

As per Bloody Barons troops may be taken at one grade lesser quality than that given – this is only allowed for Regular units by reducing the cost of a Regular base by (-2) points. The unit is now treated as being of Levy grade, its CV is unchanged. Veterans must be taken as veterans.

 .

Critical distances

Any distance in BB that is given as a distance of 1” or 2” to conform to a spacing rule or such is termed a critical distance and remains unchanged for 28mm play.

 .

Generals attaching to Units

When Leaders in Ass Carts attach to units (place behind and in touch with the unit) the player leaves the Ass-Cart model on-table if the general is designated as being in the back ranks. If he moves to the front rank, remove the model and replace with a General’s foot command base and place in the front rank as per the rules. When he leaves the unit replace his foot command base with his Ass-Cart model.

 .

Skirmishers

Skirmishers represent concentrations of men formed into units of 4 bases. They are treated as handgunners in the rules with the following exceptions. Units reduced to 1 base are removed from play at the end of the phase in which this occurs.
.
Movement – Skirmishers do not need motivating. They move 2d6”+1” per turn. When contacted by non-skirmisher types (ie those with a CV) the contacting unit rolls 1d6 to see if the Skirmishers disperse (on a roll of 6), adding +1 drm for every multiple of 4” the Skirmisher unit is distant from any main body unit (ie one with a CV) or a Leader, and a further +1 if the contacting unit is a Wheeled-Cart; subtract one from the die roll if the skirmishers are in terrain that has a disordering effect on the contacting unit.
 .
Example – a skirmisher unit that is 10” away from a friendly Spearman unit on a gentle hill has an enemy Spearman move into contact with it. The hill does not slow the Spearman so they roll a d6 with a +2 modifier. If the Skirmisher was in woods then the drm would be +2-1 =+1
.
Shooting – Shooting casualties inflicted on enemy units may only be taken from the front rank. When firing they have one range band, close range.
.
Fighting – Skirmishers may engage in combat with other Skirmishers (never units with a CV). Contact between Skirmishers is possible if a Skirmisher unit rolls sufficient distance (2D6+1) and moves into contact. If contact is made then pair up Skirmisher bases and roll an opposed ‘fighting’ die roll, with an equal score resulting in both bases being lost, else the lowest score is removed as lost.
.
[Design Note – Skirmishers are a bit different to the handgunner rules in BB. I wanted a little more skirmish interaction as they do or can comprise a reasonable part of a player’s army. I also wanted to restrict their tactical flexibility somewhat more than handgunners are in BB. The rules provide for skirmisher combat to occur but not with formed units as per the BB rules – this seems appropriate. In addition the interaction with other unit on table is reflected by the modifiers when they are contacted by formed units in movement. This provides them a better degree of survivability if they are in suitable terrain and/or when they are located close to support troops or a leader. This will have the effect of making skirmishers on their own quite susceptible to scattering unless commanded or near friends which should limit their ‘cleverness’ during the game].

 .

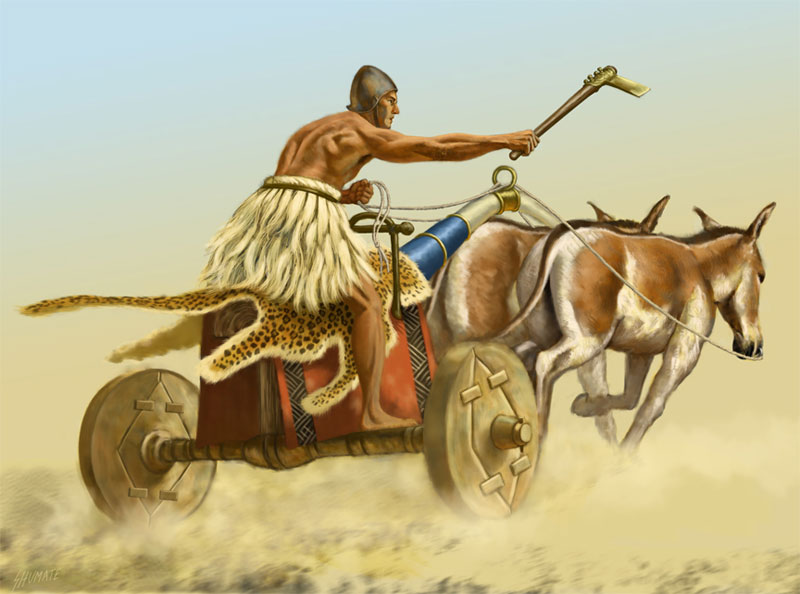
4-Wheeled Battle Carts

4-Wheel BattleCarts models are considered to be 4 bases strong (ie the same as the number of equids). Two such models form one unit being 8 bases strong – they are always this size. No rules are used for Captains with Battle Cart units as they are considered to be part of their intrinsic fighting ability – ignore them. 4-Wheeled Carts are considered cavalry for movement purposes, except it cost 2AP to make a facing change. Battle carts operate in ‘swarms’ so may shoot all round. Each 4-Wheel Battle Cart base rolls one shooting die per ‘base’ – so a fresh unit of 8 bases fires 8 shooting dice.
.
In combat they fight as one base per ass, with losses being marked on the unit until suffering 4 losses whereby the model is removed. Each ‘base’ rolls 1d6 in their first turn of fighting to determine their Combat Value as long as they have not suffered any casualties (so a fresh unit will roll eight D6), adding combat factors and re-rolling dice rolls as required by unit quality. If charging against Spear or Pike units that are not disordered then they roll D3 dice instead.  If they fail to break their foe or are marked with at least one base loss, they are much less effective and only roll 1D3 in combat.

 .

2 Wheeled Platform Carts or Straddle Cars

2-Wheel BattleCarts models are considered to be 4 bases strong (ie the same as the number of equids). Two such models form one unit being 8 bases strong – they are always this size. No rules are used for Captains with Battle Cart units as they are considered to be part of their intrinsic fighting ability – ignore them. Platform Carts and Straddle Cars are considered cavalry for movement purposes. Battle carts operate in ‘swarms’ so may shoot all round. Each 2-Wheel Battle Cart base rolls one shooting die per two ‘bases’ – so a fresh unit of 8 bases fires 4 shooting dice.
.
In combat they fight as one base per ass, with losses being marked on the unit until suffering 4 losses whereby the model is removed. Each ‘base’ rolls 1d6 in their first turn of fighting to determine their Combat Value as long as they have not suffered any casualties (so a fresh unit will roll eight D6), adding combat factors and re-rolling dice rolls as required by unit quality one lower than their actual quality (ie if a veteran unit then re-roll as if regular quality). If charging against Spear or Pike units that are not disordered then they roll D3 dice instead.  If they fail to break their foe or are marked with at least one base loss, they are much less effective and only roll 1D3 in combat.
.

[Design Note – Battle carts are the major addition to the rules for the Sumerian period. Fundamentally they are treated as cavalry with a modest missile capability which operate in a swarm on the battlefield. Whilst they do need to close with the enemy battleline to use their javelins, they’re still more mobile and faster than their enemies which provide them with the necessary ‘agility’ to make such tactics viable. Modern reconstructions have shown them to be far more ‘nimble’ than previously thought, with a turning circle similar to that of a modern automobile.  They can off course also charge into contact, but usually after their enemy is weakened or against dispersed or tactically disadvantaged opponents. The ability to allocate hits to enemy models provides for the abstract effect of reducing the combat capability of the 4-ass battle cart arrangement. Thus, when a wheeled cart unit is fired upon the normal rules for determining the allocation of hits is done. It will then be to the opposing side’s advantage to apportion losses to the two separate models in a wheeled cart unit as their fighting dice will now be reduced to d3 for all bases that will fight. It is worth pointing out that dice rolls can (and often will) produce extremes in combat capability – this is intended].

 .

Command Vehicles

Leaders mounted on Straddle or Platform Carts can be used to influence control over skirmisher units. In this case, they may be considered a ‘main body unit’ and the skirmishers can roll for evasion measuring distance from this leader (see skirmisher rules above). Command vehicles are treated the same as Generals for movement (30.3) and loss (30.5) purposes. One command vehicles may be purchased for every 3 skirmisher units in an army. Cost 20pts.

[Design Note – commanders are given the ability to control skirmishers. Whilst we are not entirely sure of this battlefield function for leaders it seems reasonable in these organised armies with leaders of various levels of rank that such battlefield positions existed. It also adds texture to the battlefield utility of skirmisher elements in the game].

 .

Wild Tribesmen

Wild tribesman that roll AP dice and have sufficient AP to close into contact with any enemy must spend 1 AP if they wish not toclose into combat. However, when Wild Tribesman units wish to close into combat they only cost 1 AP to initiate contact (instead of the usual 2AP). Wild Tribesmen roll 1d6+1 (per base) in their first turn of close combat, in each melee to determine their Combat Value as long as they have not suffered any casualties (it’s easiest to add the face value scores of the dice and apply the total number of bases in the unit as a ‘+’ modifier). However, should they fail to break their foe or have taken losses, they are more likely to lose heart and only roll 1D6-1 for the second and subsequent round.

 .

Armoured Cloak ‘Spearmen’

These troops may be taken equipped with Pikes as per rule 33A. No other troops may be ‘pike’ armed.
.
[Design Note – pike armed troops are not considered to be of the Classical Greek Macedonian style of pikemen. Rather, they are troops who have longer two handed weapons than the standard spearmen and are more akin to the long thrusting weapons of the Mycenaean Greek age. The existing BB rules account for pikes in a simple yet effective way and add a nice degree of tactical variation amongst troop types].

 .

Massed Archers

Massed Archers may inflict casualties on any rank of troops.

 .

Shielded, Protected and Unarmoured

A number of effects apply depending on whether a unit is Shielded, Protected or Unarmoured. They are shown on the playsheet and summarised as follows;
.
  • Shielded – they gain a +1 save when shot at and in combat if they do not lose the last round of combat. When leaving disordering terrain they fail on a roll of 3,4,5,6.
  • Protected – neither advantaged or disadvantaged in shooting or fighting – the default troop level of protection.
  • Unprotected – they suffer a -1 save when shot at. Regular or Veteran Unprotected troops do not suffer disordering terrain effects as per rule (33.E) in Bloody Barons.
[Design Note – the grades of protection are another significant change to best be able to portray different levels of protection. By making the standard protection level of Sumerian ‘battleline infantry’ the ‘middle position’ we can nicely show the effect of unarmoured infantry, mostly skirmishers, and the strengths and limitations of the iconic shielded formations so often seen in Sumerian army depictions. I have chosen to show the main benefit of the shields as being one of high protection from missile fire, slowness in rough terrain and with a combat advantage when successful in melee ie when shielded units lose a combat we are representing the enemy ‘breaking in’ to the shield frontline and pushing into the rear ranks negating their shielded formation benefit.

 .

Standards

Troops within 6” of an army standard may re-roll all morale check die rolls in a turn.

 .

Generals (4” or less to enemy)

When rolling to see the effect on a general when he is 4” or less from an enemy unit (but further from any friends) always count the +1 bodyguard modifier.

 .

Unreliable Allies

An ally general is potentially unreliable. His reliability will not be established until his first motivation roll. Therefore, if his first unadjusted motivation roll is ‘double one’ or ‘double six’, he will not commit his command until the end of a turn in which either:
 .
  • Enemy were seen to be closer than 8” to, or shot at, any of his units.
  • 4 more enemy than friendly bases were lost or became broken.
  • His Motivation dice is successful, in the turn following that in which the Army General motivates him successfully as his only motivation roll for the turn. This simulates delay while the situation becomes apparent, the sending of threats concerning the person of the general or hostages or promising bribes, temporizing, renewed appeals and so forth.
Until his reliability has been established or his command committed:
 .
  • His troops cannot shoot, or move closer than 30” to any known enemy.
  • If any of his side’s commands were broken last turn and no enemy command is broken, his command will change sides and become a committed enemy command.
[Design Note – these ally rules are based on DBM’s ally rules suitably adjusted for BBSW. They provide what to my mind seem entirely plausible behaviours for armies of the Sumerian age].

 .

Victory Points

As normal except as modified for terrain and events above.


Scenery

Each player should take one field system as part of their initial selection. Each player may decide if irrigation ditches surround it or not. The defender may place fields wherever he wishes on the table. The attacker may attempt to move fields but may not move them towards his own side closer than the half way line. Fields are treated as worth 4 victory points for either the attacker or defender at the end of the battle. A field without irrigation ditches is treated as open ground. A field with irrigation ditches does not provide cover from missiles, costs 1AP for a front rank to move across, does not slow but does provide a risk of disorder after crossing it on a 3,4,5,6. Generals in Ass Carts are carried across ditches suffering no ill effects.
.
An army may choose one flank as one of the Great Rivers, Tigris or Euphrates, effectively closing off one flank.
.
Hills do not give victory points to the defender.
.
Either side may choose a shrine. Shrines are initially placed by the defender, however it cannot be set up further than 6” from the centreline of the table between the two forces. In his scenery phase, the attacker may move it but again it must remain within that central 12” of the table. It is worth 5 VPs for whoever owns it at the end of the day.

 .

The Palace Treasury

Instead of purses in Bloody Barons, the Patesi (ruler) of a city spends silver rings on securing pre battle advantage in a similar manner. Each army has 70 rings to spend on the following areas.
.
Total number of rings (dice) must equal 70.
 
Event Title
Number of rings (dice) allotted to the event
1. The Attacker
10-25 (with normal –1 for higher bidder)
2. Men of Tongues: spies
1-9
3. Bazahatum: provosts and police
1-9
4. The Temple
1-9
5. Scouting
1-9
6. The Palace
1-9
7. Loyalty
1-9
8. Weather
1-9
9. Route of March
1-9
10. Strong Leadership
1-9
11. Quest for the Nam.Lu.Gal
1-9
Total Number of rings (dice) must equal 70
Roll for each ring spent on an Event. Every 5-6 on a D6 is a success. Check the net number of success on the table below. Attacker/Defender is as per the rules.

 .

Events Tables

Men of Tongues: spies
# Suc
Result
1
Zimri Lim has come with information of great import.
Troublesome and greedy peasants with spurious information of little value beset you. You put them to work building irrigation channels and curse them for wasting your time.
2
I know that Eannatum has drunk strong himrum this day!
You may force an enemy to reroll any one successful arrival roll for a late unit. Himrum is an aniseed-flavoured ale.
3
I have stolen the enemy Rab Amur’s Anunitum! Even now he runs around in panic lest the gods desert him!
The enemy must deduct five rings off one event that has five or more rings. If no 5-ring events are available then a four-ring event is chosen. The anunitum is the personal statuette placed by a nobleman in front of the god in the temple to act as his proxy worshipper.
4+
Thus spoke the Temple Ecstatic!
Any two pairs of enemy units can be swapped (not Rab Amurrim or Veterans). This includes on/off table units. Thus a flank citizen unit could be swapped with an off table levy unit of tribesmen. Then a second swap can be carried out.


Bazahatum: Police/ Provosts

# Suc
Result
1
“The Beacons are lit! Nina asks for aid!”
“And Larsa will answer!”
Torch signals go up summoning allies and outer garrisons. You may reroll any one unsuccessful lateness roll. Cue stirring music and heroic poses by all players.
2
Bazahatum discover shirking nomads and thrash them, driving them forward to the glorious battle.
You may reroll any two unsuccessful lateness rolls. Bubba the Sutean scratches his belly and strolls down the road to victory.
3
We have made them take the assakum oath! Their hearts are ours!
Raise one levy unit to the rank of regulars. Breaking the assakum oath in which one ritually ate certain foods would guarantee the food would rise in your stomach against one’s wickedness.
4+
Tell them that Babbar the sun god marches on our right!
Raise one unit to the rank of veteran. Best used on a levy unit. Troops always like to know that the gods are getting directly involved. It makes it more personal.


The Temple

# Suc
Result
1
The enemy has neglected his kispum. See how his men tremble!
Move one enemy flank Rab Amur to the baseline as he wonders about the piety of his master. The kispum was the ritual meal in honour of the ancestors that a patesi was meant to stage.
2
Our barum priest has spoken most cryptically.
Win or lose, you can interpret the reading of the sacrifice’s liver in a favourable manner. Gain 1VP.
3
Our troops have sworn the tebibtum oath of purification.
You may reroll any one morale test during the battle, since the troops fear to break their oath of loyalty.
4+
The Devouring of the God
Disease strikes your foe. The enemy picks any one flank unit. Roll 1d6 (+1 if levy –2 if veteran). That number of bases is removed.
 

Scouting

# Suc
Result
1
The god guided our troops through the darkness of the night!                                                       Move one unit into an orchard, building, shrine or behind a hill anywhere on the table not in the Enemy’s deployment zone.
2
The Mari carts have swiftly conveyed our men to the enemy’s flank!
Move 1 or 2 units (plus a general if desired) off table. They roll for arrivals as if late units on a 4,5,6 and they will arrive all together on a flank edge not the baseline.
3,4
Hah! Our horseman has noticed a flaw in the enemy’s plan.
This new-fangled horse technology has its uses. Move any one piece of terrain to a flank sector. This can be used to move both shrines and fields out of the defender’s half of the table to near one of your own flank sector baselines.
5+
The ancient shrine has been rediscovered. Let us rejoice that the enemy has not defiled it.
Place a shrine dedicated to your god by a previous patesi anywhere on the table. This is worth 3VP if you keep it uncaptured by the enemy by the end of the battle but it is worth 5VP to him if he captures it.
 

The Palace

# Suc
Result
1
The Queen has sent a wondrous garment wrought by her own hand.
How nice. You may rest assured that your commander is the best-dressed warrior on the field.
2
Well fed donkeys                                                                                                                                                  Kikkuli the Donkey Master has produced tip top, spanky new donkeys to pull your donkey cart. One of your generals gets +1 on his movement rolls.
3
The Palace Workshop staff has laboured through the night. These six shekel samrutum arrows are honeys.
Gain five extra arrows markers allowing a 1AP volley. Let’s be generous, waspum (sling) users can also use these. Nice rocks?
4+
Enki, Lord of the Deep has turned the enemy ale supply to a vile brew!
Select a flank. Roll for each unit: on a 5 or a 6 it is late as the troops grunt behind a nearby orchard and look for broad leaves and smooth stones.


Loyalty

# Suc
Result
1
Your loyal subjects present you with a fine humbaba head brooch to drive away evil spirits.
How nice.
2
We have heard that Shamri –Adad was insulted by the enemy patesi.
Select one enemy flank general. He now suffers a 1-point penalty from any motivation rolls until another enemy general successfully motivates him.
3
Men of Dilmun have provided me with luxuries to open men’s hearts to your words.
Select one enemy flank general. Move him to the base line. Treat him as being late. Roll for his arrival as normal. Dilmun was a fabled Gulf trading centre possibly in the vicinity of Bahrain. The Mesopotamians always wanted foreign luxuries.
4+
Your son has married the sugagum’s daughter. Huzzah!                                                                     Raise any one unit in the centre to veteran status as the wine sozzled troops celebrate the nuptials with weird ululations and a frenzy of violence (these days they just discharge AK47s into the sky). The sugagum was the sheikh of the non-urban troops on the periphery of civilisation.
 

Weather

# Suc
Result
1
Dagan has allied with us! The sun shines again.
One unit must shuffle.
2
Dark mists linger on the lands.
Player rolls d6-2 shuffles.
3
Tears fall from the Tin Vaults of Heaven                                                                                                          Bad Weather. D6-1 shuffles. Any irrigation ditches count as swollen and cost double APs to cross. Roll twice for disorder. Arrow and sling range decreases by 2”. At the end of each turn, roll a D6: on a 1-2 the storm clears. No, I’ll be honest, I don’t know why they thought the vault of Heaven was made of tin. Any comments?
4+
The Storm Bull of Ishkar strikes! What madness reigns?                                                                      Very bad weather. All rivers impassable. All irrigation ditches impassable. Arrow and sling range decrease by 4 inches. As the lightning bursts from the black vault and the Storm Bull roars, add +1D6 to any morale checks. Your opponent suffers a 2-point penalty on motivations and you suffer a 1-point penalty. Roll a D6 at the end of each turn. On a 1-2 the storm ends and drops to level 3.


Route of March

# Suc
Result
1
Lazy Nomads. They lie like dogs and snore like pigs!
Choose one enemy levy unit and move it back to the baseline.
2
What does one torch beacon mean? Two beacons means ‘Come and help’. Maybe one beacon means ‘Everything’s fine, continue with breakfast’, yes, that’ll be it.
Confusion over the exact nature of beacon signals delays some of the enemy’s troops. Enemy chooses one unit to be taken off table as late.
3
Efficient Kigamlum administrator.
Buniya gets your troops on the right route with breakfast in their bellies and rations in their sacks. Roll for upto 3 units, which are classed as ‘late’ and on a roll of 5-6 restore them to the table. The kigamlum was the donkey park attached to every trading station.
4+
No you idiot! I need a hallu wheel not a mallalu wheel! Are you stupid?
A broken wheel on a general’s battlewagon holds up the entire column. Pick an enemy general. The general’s quality decreases by one and his movement is penalised 2” per turn.
 

Strong Leadership

# Suc
Result
1
He would be Nam Lu.Gal before he has struck a blow.
All enemy generals are moved to the baseline after bickering about incautious comments by the patesi.
2
Oh Zimri Lim, swear that you will not neglect me and I will hover over you and deliver your enemies into your power.
Inspired by your piety all your generals can ignore one failed motivation roll in the first turn.
3
His weapons in the sea he washed. With the men of Umma he fought, all the fields he devastated, their city he subjugated and its wall he destroyed.
Pick one of your generals. Instead of a combat value of 5AP, this mighty man adds 7APs to any combat he joins.
4+
Loyal Ensi comes to the rescue                                                                                                                             Any one routed unit returns to the table as reinforcements on the roll of 3-6. The unit is treated as a late unit and placed in either the centre or either flank. An ensi is a provincial governor installed in a subjugated city.
 

Quest for the Nam.Lu.Gal

# Suc
Result
1
King of Kish: let it be written in the lists.
Reroll one general’s quality. You must abide by the second roll.
2
Sargon, king of Agade, overseer of Ishtar, king of Kish, pashishu-priest of Anu, king of the land, the great vice-regent of Enlil
Improve one general’s quality by 1.
3
The Hand of Enlil a rival did not permit. 54,000 men ate in his presence.
Improve one general’s quality by 1 and add one base of Veteran Royal Guard (bodyguard base)
4+
Enlil has given unto him the kingdom, Agade, exalted of the gods.
 You are the one, true NAM.LU.GAL. Gain 3 VPs win or lose. Your deeds shall be written in clay for the generations to come to look upon and wonder. When your Gidim wanders the underworld, men will still remember with awe your deeds.


Painting II – Battle Carts

In this installment we look at that most Sumerian of creations – Battle Carts! Specifically I’m going to detail my efforts in painting and assembling these weapons of war, ready to hit the table top!
 . 
One of the main attractions for pre biblical Near Eastern gaming is the distinctive and unique battle carts. When I first became interested in this period I thought the a-typical four ass (onager/equid), four wheeled battle cart so often seen, were the only types in use. With more research it quickly became apparent that there was more to it than met the eye. Those familiar with the period will know of the other cart types but it’s worth summarising these other ‘vehicles’ that make this period so unique.

Carts

The standard four ass, four wheeled battle cart was made of a lightweight timber frame with panelling. The front end was elevated and provided a means of protection to the crew, which usually consisted of a driver and a javelinmen, who also could be equipped with an axe.


The other type of vehicle used was a ‘straddle car’. These vehicles have a single rider drawn by a four equid arrangement, though they are often depicted as having two equids. The four equid arrangement seems to have predominated in the third millennium with the two central animals doing the heavy ‘draught work’ (engine) and the outer animals being controlled with reigns to provide a method for guidance (steering ). This ‘tugging’ caused the animal to move in the direction of the ‘pull’ and thereby made the others follow thus allowing for directional control….so goes the theory.
 .
Note, even though two equids are shown, the picture is deceptive. Look at the draught pole – it sits behind these two ‘right side’ equids, the other two animals being obscured by the picture’s perspective.
.
The other two wheeled vehicle that occurs toward the end of the third millennium is the two wheeled platform cart, again ‘powered’ by the same equid arrangement as the other vehicles above. This is an interesting development that moves toward the classic chariot of the 2nd millennium, typified by the Hyksos, Hittite and Egyptian chariotry of the day.

Use

The use of the four wheeled, four ass vehicles is highly debatable – ranging from them being little more than command vehicles, to fully fledged charging weapons of war akin to heavy knights in medieval times. They could’ve been use as skirmishing vehicles with a missile capability or a combination of both if the combat circumstances were right.

I suspect they had a decidedly combat function as well as ceremonial one in ancient Mesopotamia and though not impressive by ‘ancient’ standards they nevertheless encompassed a mix of a fast moving vehicle platform, possibly supported by ‘runner’ infantry, coupled with an an onboard missile capability that could charge targets of opportunity or pursue defeated or weakened foes….not really decisive at one particular combat role but unique enough on the battlefield in the speed the vehicles gave to their crews and to battlefield commander’s ability to deploy combat power.

Like the Battle Cart, the Straddle Car’s use in battle is not really known. They could be used for scouting, command purposes, possibly even in massed formations (though we have no firm proof yet) or perhaps as a form of light fast moving chariotry for pursuit (similar to light cavalry)….no one is really sure. When buying miniatures for this type of vehicle however you will often only see a two equid arrangement as that is how they have been portrayed in the limited modern artwork that is available as shown above.

Platform car uses would be similar to the straddle car but being enclosed they have more protection and possibly more combat punch or missile capability than a straddle car but not quite as much as the heavier battle cart.

Whatever their role, whenever anyone tells you what they were used for they are giving you their opinion as now one can definitively say!


Which type to paint?

There are a number of manufacturers of Sumerian battle carts. As you know from my previous posts I have settled on the comprehensive range of minis from Cutting Edge Miniatures. These provide all the above vehicles except one, and lovely models they are to. The missing models, from the Cutting Edge range are the Straddle cars. Fortunately our friends at Eureka miniatures have produce two very nice models – one for a straddle car and one as a variation on a platform cart.
 .
 .
 .
So these will do very nicely for modelling those vehicles. For those wanting other types of straddle cars Newline also do a nice model for yet another version to add to your army.
 .
 .
And if that were not enough, our other Australian mini manufacturer, Castaway Arts, also do Sumerian vehicles of war…though I can’t seem to find it on their webpage, they do have one so it may be worth checking out.

Preparation

Ok, so onto the Cutting Edge Battle Carts….all ten of them in my case!! I’ll be making the Battle Wagon and Platform Cart as shown below. The first thing you’ll note is the high quality casting on these models. The four equids are very clean models and require pretty much no clean up at all. The crew are equally cleanly cast and are cast without bases for mounting in the carts. As I’ll be using the Army Painter ‘goop’ on these models I have temporarily superglued them onto a base to enable me to paint them (see below) – you have to do this if you want to use the army painter so the ‘goop’ settles properly.
alt
 .
.
alt


The ‘cart’ comes in a number of pieces that go together very well so virtually no ‘filling’ is required as the cast and model is a crisp quality model. By the time you have super glued them together there are no unsightly joins in the model – excellent! One point I did find however was the ‘pin guide’ on the side boards of the carts needed an ever so slight trimming to make them fit a bit more easily – really not much of an issue.


When prepping these models I think it is best to completely assemble the model and then paint it. Trying to paint the carts in parts and then join them together is not going to work if you use the Army Painter method of painting. One of the great strengths of the ‘goop’ is that it will gather in the cracks and corners of the vehicle so it’ll create shadow line effects and hide any glue joints, slight cast imperfections should that be the case, etc. It also helps ‘bind’ and strengthen the finished model. All in all having just one piece to paint is a much better idea.
 .
On the subject of glue, I usually use Zappa-gap but have used a different super glue for these models. It is Tarzan’s Grip super glue (bought at the local hardware) and apparently is four times the strength of normal super glue. I don’t want any models falling part with the occasional model drop or such so have gone for as strong a bond as I can find….I’m not sure if this is necessary, but why not.

Equids

Ten battle carts mean 40 asses to paint! That’s a lot to do so looking for a good way to do them and fast seemed like a good idea. Fortunately, here is a ‘quick step’ process to get these done and they look pretty good. Its not a bad idea to Google search for pictures of Onagers as these animals have a distinctive look. Essentially they have a light underside and red-brownish upperside.


Place all the models on a board ready for spray painting. Get a can of white spray paint and spray the miniature all in white. A good solid coating and then set aside to dry.


Then stand the models up and get your can of Army Painter Barbarian Flesh spray (the same stuff I use to undercoat all my foot) and spray the miniatures from above so that the paint is on top of the model and doesn’t spray paint the underneath of the model. You can then do this spray painting again with about a 30 degree ‘spray of the vertical’ to get a bit more paint on the side of the model…this is to done to taste and how you want the animals to look.


Note the blended effect from the top of the model to the under side color.


Very quickly you get the model painted in its entirety and with ‘bleeding’ toward the under color of white that produces a very nice airbrushed effect. As one final step I go back and stimple a slightly darker brown shade on the backs of the equids to produce a bit of variation and shading effects – basically this prevents all the animals looking the same. This whole process get 40 models painted in very short order.


Here the you can see the ‘stimpling’ on the backs of the equids.


The rest of the painting will be involved in doing the belting. The models themselves only have a small amount of belting so this is a fast step. The barding is not yet painted, but this is a choice. If you intend of painting the barding in colors that will be ‘goop friendly’ (reds, browns, yellows, off-whites, and creams) then you can paint the barding now. As I want to paint the barding in different colors I have left this step. Paint in the hooves as well and some ‘leg shading’.


Models all painted, minus the barding, ready to goop.


Gooping!

Once the models are done goop the miniatures with the SOFT TONE quickshade. This produces a nice effect on the models, better than the strong tone in my view – dark tone is too dark and will spoil the model.


Note how the Soft Tone goop blends the colors without really changing the paint shades – this works well for these animals.
When gooping the models let the quickshade settle as normal and if you wish to produce a nice ‘highlight’ spot around the underside of the model use a bit of turps on the brush to draw of the goop, or do it before the goop settles too much. When you ‘batch paint’ you might find the turps gives a smoother finish and better control of ‘pulling off’ the slightly hardened goop. As mentioned in my previous post, the goop actually starts to settle quite quickly so only doing 4-6 animals to completion and then the next lot is advisable. This also works on the hind quarters as well. All this is done to taste and how you like the look. The ‘hot spots’ are shown on this ass.


Once the models are completely dry (24hrs at least) matt spray the model. Normally I use dullcote but bought a can of the Army Painter Matt spray and have to say it’s as good for half the price and none of the noxious fumes – I think I’ll be moving to the Army Painter flat spray from now on.
 .

Once they are all dry go back and paint in the barding in the colors you wish. I prefer bold block colors – reds, blues, white, yellows and in fairly natural, not gaudy, tones. Once done you can go back and give them a wash in inks if you like or leave the painted barding ‘as is’ – personal choice.

I used some shading with the new Army Painter inks that are water based and match the cans of quickshade. These are really useful for small quick jobs were you want a wash and shade and quick dry. Ideal for the barding. One point on the small pots of water based inks. They provide a nice shade effect but in my view are in no way as good as the ‘goop’ in the cans. The quickshade sold in cans has a viscosity that makes the shading effect work much better than water based inks and provides a much harder and tougher protective coating.

 .
 .
 .
Once the models are all done I then go back and hit the animals with slight semi gloss sheen. This restores some ‘depth’ to the animal coat and makes them look (and feel to touch) better in my opinion.

Battle Carts

OK, so we’ve got some locomotion power painted, how about the carts themselves. After trying to decide what color to use to get the best wood effect I want settled on a ‘light wood’ color to best represent relatively well maintained battle carts for the kings army. I initially painted a dark wood coloration but didn’t like that effect. Given that I think in my mind these are maintained in pretty good nick by the imperial battle cart stable hands I am going for a uniform ‘new-ish’ look, which is part the reason I wanted to paint them all at once.
.
After a little experimentation the best color I found to give a natural light wood effect (after having been gooped) is the foundry paint color triad – BUFF LEATHER; code 7A,7B,7C.
Buff 7A code.png
Giving the vehicles a complete spray paint of white, top and bottom, it was a simple matter of painting the bottom color, letting it dry, ‘patching’ the middle color to create an irregular effect, and finally highlighting edges and the like with the top color. The actual results varied a bit but overall consistently pleasing. That means some look a touch better than others but all look more than OK!


Two wheeled platform cart, part assembled.


Model undercoated and getting the’7A’ base coat coating.


7A basecoat color applied. Note the small Blu-tack block to help in painting the javelin quiver.

.

.

The base coat has now been stimpled and dry brushed a bit to lighten the color.


Again, the question of how to paint the panels needed to be decided. I’ve gone for several colors of red to create a unified, but slightly different look in each vehicle. Essentially they are all red however. The colors were earth red colors and not bright red colors. This ‘panel work’ takes a steady hand and a bit of patience, but you only do it once! After that the models has very little to do. A gentle highlight of the 7B/7C to your taste to highlight the hard edges on the cart and they are pretty much done. The rope on the cross bar is painted a neutral color of off white to create a contrast.


The final drybrush coat (7C) has been applied and the paneling painted in.


Rope on the cross bar, bronze ring on the draught pole and the wheels edges painted – ready for gooping!


All this having been done it time to goop! Use the middle strength can (STRONG) and apply to the underneath first and then from the top down, being careful not to let to much puddle in the many corners of the cart and around the panel work. You need to go back and ‘draw off’ of the excess in a similar way to the foot figures and the puddling that occurs around the feet of those models. This step doesn’t take too long and provides a nice strong protective coat for your miniature. Once its all had the 24hr + drying time simply hit it with matt spray and the model is done.

Crew

There’s really not much different here than painting the foot figures described in the previous painting post. The only issue with the minis is that they do not have bases so if you are going to goop them they must be secured in an upright position so the quickshade goop settles properly over the model. Not a huge problem, I temporarily ‘tack’ superglued them to a base for this step. In fact I did it for the painting process as well, but you’ll find they do have a tendency to fall of you base as the contact point for gluing is so small…tiny feet. To prevent this being an issue, have some blue tack around and quickly push it onto the base and temporarily mount the miniature in an upright position.
 .
Once the crew is all painted they get the goop treatment as before, sprayed matt varnish and then all the parts are ready for assembly.
Figures temporarily super glued to the base so they can be gooped.

ASSEMBLY

Having painted all the components of the models they need to be put together. You need to decide what bases they are going to put on and also how they are going to look. So before I glue anything down I get all the figures and place them in the carts to achieve the look I’m after when they’re all glued in. After this it’s a matter of supergluing them into place. Once that is done the models then need to be based.

Figures not yet glued – this gives an impression of the finished combinations.

Deciding how you are going to base the figures and on what you are going to base them becomes the next ‘point of no return’. Once these models are all glued down there’s pretty much no getting them off again so be sure how you want them based! The models are quite large and whilst the four ass carts do fit on a 60mm wide base it is a tight fit. I believe though they have been sculpted as such to ensure they fit this ‘standard’ base width.

70mm x 70mm bases.

My basing will be on 70mm x70 bases. The bases I am using are galv metal so this adds to the weight of the model. If you don’t like the model heavy then perhaps another basing material would be useful. You can get ply bases cut to size which are lighter but ensure the ply does not have a weakness ‘with the grain’ of the wood. The actual models themselves are pretty chunky and a considerable weight . You do not want the model all glued up and then have the base crack with an inadvertent drop…something to consider.

The models go together quite well however before gluing anything you must off course set the model up on the base and see how the parts fit (as shown above). The cart model has been designed such that it should be mounted on a ‘fillet’ to raise it a bit higher than the base it’s mounted on. The idea is that the base of the wheels of the model match the hooves on the equids on their molded bases ie if you drew a straight line from the wheels to the equid hooves’ they should be level (parallel) with the base of your model. This effects the angle of the cart draw pole.

A ‘filler’ raises the cart to match the correct height of the equids.


I found that having got the filler on the base it was easiest to position the equids in the arrangement I liked best, abreast of one another and then place the cart down and see how the cross bar ‘sits’ on the equid models. I noticed that a bit of ‘bending ‘ of the draw pole on the model was required to get the cross bar to sit properly just above the equids harness. When you do this leave a bit of space between the crossbar and the equid so you can apply the rigging (see below). When bending the draw pole, use a bit of tissue on the pliers to ensure you do not damage the paint work and support the connection point on the underneath of the cart so you do not ‘snap of the draw pole’ when bending.

Once I’d positioned the equids on the base and got the draw pole-crossbar arrangement at the correct position it’s time to glue. You’ll need to decide the glue you’ll use but I have used that Tarzan’s Grip super glue to ensure a solid “never coming off” bond on the metal. I glued the outside animals first and then the inside ones. The superglue does not set hard immediately so you have an opportunity to position the equid exactly where it needs to be on the base.

Once the equids are glued down I then superglue the cart to the filler base, which at this point is not yet glued to the base. The final positioning of the cart is done by gluing the filler base (with cart attached) to the actual base of the model. All this is is then set aside to set ‘rock hard’ so that when you pick it up it is a absolute sold ‘piece’.

As I did all ten models at once this gave me the opportunity to try and achieve ‘a look’ en-masse that I wanted to create. By mixing and matching the crew arrangements on the models I could position them how I liked and get the effect of what all the models would look like when put together. I decided I would vary the crew numbers but go with 3 man crews as a mainstay as I wanted to create the effect of ‘mass’ on the model. Even though we understand that the crew may have consisted of only a driver and javelinmen I assume there was a degree of flexibility with the crew numbers and specifically who would ride in them at various points in a battle, as the supporting foot moving along with the battle carts could possibly hop on or off as the situation required to fight or protect their charioteer. This is a personal choice whether you crew with 2 or 3 men onboard….the three man carts look a bit ‘tougher’ in my opinion!

The positioning of the javelin quiver case is a touch controversial. It makes no sense really to have the case thrust forward the way it is but that is how it is depicted historically and thus I went with this interpretation. I think having it swept back makes a lot of ‘real life’ sense to allow easier access for the crew to get the javelins…but it looks better forward I think and that’s what the Standard of Ur shows us!

UR BC


When gluing the crew in the model I didn’t do anything like scratch away the surface to get a metal to metal bond. A liberal dose of superglue is a pretty strong connection and when the crew are all bound together in the cart the bond becomes that much stronger. Importantly, when gluing the crew make sure you get two point of contact to secure the figure in the cart or at least onto another figure in the cart. If you just glue the feet you may find that the bond is not strong enough and the miniature will fall of the cab, possibly taking some of the paintwork with it.

.

So glue it in nice and tight and a bit more is better than a bit less. Where crew  are close to touching each other I glued them together as a point of contact to once again make the connection strong. A really useful friend when doing all this is a bottle of ‘Zip Kicker’ to accelerate the superglue bond instantly. This locks it all in straight away and makes positioning the models easier.

Once the models are all dried and secure on the base I then use simple white glue to smooth out the edges of the bases and make for a nicer transition from ‘base to model’ such that you cant really see the miniature base model at all. This is most pleasing to the eye and worth the extra step I think. If you use a particuarly type of flock that hides the model bases then this step can be skipped. For my simple flocking method it is mandatory.

White glue liberally spread around – be generous as the glue shrinks.


Glue now dry – you can how it has shrunk for the quantity put on above.

PVA White Glue is easy to apply but a thicker medium might be required if the model’s base is too obvious. This is the case with the Newline Straddle Car model. The thicker medium or paste blends the model onto the base and looks better – an important but not always allowed for step until its to late after the flock has been applied.


Newline Miniatures Straddle Car.

So with the models now all secure and the base preperation complete its a simple matter of flocking the base as you desire. I use the same method as for my infantry. This is a mix of Woodland Scenic Burnt Grass course Turf and a sand and stone mix – simple, fast and effective.


Eureka Battle cart mounted  with Cutting Edge Miniatures crew.


Rigging

The last step to get these carts ready for battle is to give them a harness or rigging. This is not mandatory to use them as they look good at this stage, so you may prefer to ignore this step because of the look it creates or the fiddly nature of the task. I think the carts look good with the rigging and the steps below describe how I did it.

One the by products of the goop application is that it sometimes puddles in small areas and fills small holes or gaps in a figure. This can be eliminated when applying by blowing on the cart whilst the goop is still wet but this does not always work and can be a bit messy. On the carts the guide rings on the draught pole are likely to have goop gather and block the guide holes. This is common but not a problem. The simple method to remove the build up is to get a suitably sized hand drill bit and carefully drill out the excess. This only takes a moment. Be careful not to inadvertently drill the draught pole paint work when you do it.

The rigging ‘rope’ I used is from a hobby shop that sells rope for wooden ship models. The size is 0.15. It’s gives a good scale effect to my eye. As the thread is actually ‘model rope’ it looks better than simple cotton thread in my view as it has a rope like texture.

Rather than try and push through single thread strands the best method is to loop the rope and use the loop to place it in the hands of the battle cart’s driver. This enables you to get excellent tension on the lines as desired. To aid in pushing through the rope you’ll need a small tool such as a blunted toothpick or such to assist in ‘pushing’ the rope loop through the guide holes. This is a bit tricky but gets easier when you get the hang off it.

.

The first looped guide hole should be the right side one. This places the rope in the hands so that when the driver has the four ropes in his hands the ‘fall’ of them looks correct. When you get the rope loop through the hole apply a small amount of superglue to the driver’s hand and place the loop in his hand. Then ‘pull’ on the thread ends so the glue sets the rope at the correct angles toward the guide pole. Note, the thread will be discoloured by the super glue. This is not a problem as it will be fixed in the last step and actually provides a bit of shading effect!


.

When this is dry take the rope ends and make a knot, with the rope leading onto the top of the cross bar positions that have the rope areas modelled. Pull the rope taught and then apply a dab of super glue to lock it all in. You’re aiming to both secure the knot thread to itself as well as onto the crossbar so that the whole has no movement. This step can be done by starting with either left or right side guide ropes- remember, the idea is to place the right side guide ropes in the driver’s hand first and then the left side loop on top of that.

.
Now go ahead and do the same for the left side so you end up with the four guid ropes securely on the model and now just awaiting trimming. When securing the second rope loop in the driver’s hand place another drop of superglue to ensure it is secure in his hand- this will also lock in the bottom loop as well further making the rope arrangement secure….you don’t want the rope in the driver’s hand coming free!
 .

Now you should have the four guide ropes knotted, taught and ready for trimming. Get a sharp blade gently slice off the excess thread. Try and get as much off as possible but do not cut the knot that is securing the thread to the model. Once all threads are cut get some small needle nosed pliers and compress the whole knot rope connection to the crossbar firmly, but gently! What you end up with are no loose ends and a nice connection between rope and crossbar.

.

 .
The last step is to get paint the same color as the rope and paint the rope to match your rope color. This will be required because of the discolouration of the super glue when applied to the thread as mentioned above. Tis will bind it all together and make it look like one complete arrangement.
.

With this step done the model is now complete and ready for action!


Showcase

So, with all Battle Carts now completed there’s nothing else but look at the wonder of them all! I hope this detailed coverage of my efforts constructing these lovely models has been helpful.

Enjoy!


 .


Warrior Kings – rules

021axx

This post will discuss thoughts and ideas utilising the new Osprey rules “Dux Bellorum” for battles in the wars of Sumer and Akkad – a surprisingly good fit. What I’m going to focus on is how these rules work in with this period and my project, so the nuts and bolts of play will not be covered unless relevant. There are many other reviews online as listed here by the rules author that go into the details of play that are worth a look.
.
So how could an Arthurian set of rules work for pre-biblical warfare?…read on and find out.

.

 .

When I first flicked through the pages of Dan Mersey’s Dux Bellorum I immediately identified a game system that had the potential to fill a gap in my project. I was after a low level battle scale system that incorporated various scenarios that reflected the many small scale actions that occurred in Ancient Sumer. The opening paragraphs detail the importance of leadership quality, individual bravery and the chaotic nature of battle. All this sounded very much how I envisage the constant small scale Sumerian clashes to be characterised….Warrior Kings was born! As Dan says, “keeping the emphasis that it’s a game not a simulation” is perfectly suited for this period as so few real details exist on how tactical elements were handled.
 .
The various types of troops and their equipment also closely aligned with those of Mesopotamian armies. Shieldwall infantry equated to Sumerian spear, shield and axe formations, warrior infantry reflect the warband styles of warfare of the Guti and Amorite tribes, the less effective Arthurian riders would  fall into line with the relative effectiveness of Sumerian battle carts and sling, bow and spear were the weapons of choice three thousand years before Arthur’s time.
 .
By using the existing structure and ratings of troops but changing for the specifics of the Sumerian period, much as Dan Mersey has done to portray the Arthurian period, I think I have a good starting point for a reasonable reflection of the importance of each troop type in ancient Sumer.
 .
In the introduction of DB Dan lays down his tenants for his game and these are the reasons why I think they will work well for the wars of Sumer and Akkad.
 .
“A Simple non tournament ruleset where players concentrate on playing, not learning and gaming for fun”.
The format of the game provides for varied pick up games that provide a structure that can easily be placed into a campaign system or for one off battles. In the Campaign post I talked about using a different set of rules within the same campaign to create variety in the battles fought and DB seems a perfect fit for that objective.
 .
“Keep the emphasis on game, not simulation”.
Given the small scale battles WK covers and the total lack of detail of historical actions of this period at the scale portrayed this will provide for believable clashes where we know no better…perfect!
  .
“Present optional rules without cluttering the streamlined basic game”.
This was a sensible idea for the basic game but the optional rules DB includes are eminently suited to the dynamics of Sumerian Warfare in my view. We will happily be using them all as standard rules and adding one or two of our own as the basic game engine in DB is flexible enough to handle it.
  .
“Engage players in every phase of the game, give them choices to make”.
I very much like games where players are involved both in their turn and also in their opponent’s – not one player doing his move whilst the other wanders off or sits around waiting for his go – DB nailed this one and the game is much better for it!
 .
“Flexible army lists, that reflect my own and other interpretations, whilst retaining the character of each army.”
This was mandatory for me to be able to build from the armies I’m already collecting for Bloody Barons as well as  being able to capture the feel of each army’s characteristics. By being able to create army lists the ‘pick up and play’ nature of the original game is maintained and provides for many variations in forces structures to keep things fresh and interesting.
 .
“Represent close combat as a swirling, dangerous mass rather than a well co-ordinated battle line”.
This works fine for some combat but does not necessarily define how I envisage some of the more ‘orderly’ linear battles to have occurred. Fortunately the inclusion of the optional rule “Fighting to the Front” will restore this ‘linear aspect” of armies most typically defined by the  Sumerian spear and shield formation but still allows for the swirling melees typical of forces made up of tribesmen such as the Guti, Lullubi, Amorites, etc….so it all fits in rather well.
 .
“Differentiate between offensive and defensive foot troops and allow for foot or mounted troops”.
This will account for the majority of troops being foot sloggers but will enable the inclusion of the Battle Cart mounted forces unique to the Sumerian era. With the lower scale of actions portrayed and the use of the army strategy and tactics sections quite different force combinations are possible in some of the armies that are not normally seen in a ‘battle game’.
 .
“Convey the spirit of Dark Age Battles without being too technical”.
Well, that pretty much says what I’m after as well…”convey the spirit of Sumerian Battles without being too technical”.

 .

Troop Types for Warrior Kings

I have defined the following troop types that I think capture most of the detail of the respective styles of fighting without getting into lots of ‘weapon detail’ that could gum up the works. The use of Leadership Points in DB gives players the ability to enhance their troop capabilities that don’t necessarily have to be represented in their troop stat line. Taking specific strategies and tactics also let you define your army’s fighting style. That said, the following break down of troop types makes each type feel a bit different and will further reinforce army characteristics which is a good thing I think.
 .
Household: The best and most experienced troops, the personal bodyguard of the temple and/or the retainer troops of an Ensi, Lugal, Warlord or King. They may be mounted in Battle Carts or on foot. They have higher stats than other troop types, but each army only has one such unit. The Army leader is always attached with a unit of this quality.
 .
Battle Carts: These represent the preferred method of travel and fighting style of the wealthy or well placed. They can be four wheeled Battle Carts or two wheeled Platform and Straddle Car types. Battle carts have good levels of protection with their high front construction, barded onagers and support infantry but this arrangement is still a bit vulnerable so they have a lower cohesion level than expected. Battle Cart forces ride towards the enemy throwing javelins in a swarm formation at short range, possibly charging directly into combat at weak(ened) opposition, and then close with axe and javelins supported by infantry runners if they can gain an advantage. Potentially fast moving and devastating but a touch brittle at the same time, their use must be timed else their advantage will be squandered.
 .
Axemen: Battle line infantry who are not able to use the Big Shield tactic as they relying on their increased aggressive ability when wielding their fearsome axes in combat. This gives them added aggression over spearmen. They use all the rules applicable to Shieldwall troops in DB.
 .
Spearmen: Battle line infantry, harder to hit than unprotected Wild Tribesmen but with no missile capability however usually with a good deal of protection – these troops are the most common troop type in the ‘civilised’ armies of the Fertile Crescent . May be Levy or Ordinary. To represent spearmen utilising the iconic nine-boss shield a player must take the ‘Big Shield’ tactic to reflect the shieldwall ‘phalanx tactics’ of Ancient Sumer. In some armies Spearmen may be armed with Pike, using the ‘Pike’ tactic. They use all the rules applicable to Shieldwall troops in DB.
 .
Tribesmen: Offensive infantry prone to impetuousness, they will possibly make Uncontrolled Charges whether you want them to or not. They are rated as Fierce or Wild and may be armed with axe giving them an edge in combat. They use all the rules for Warriors in DB. These are the most common types of foot troops in Amorite or Zagros Mountain armies.
 .
Skirmishers: ‘Nim’ foot skirmishers, secondary to the main battle line forces they nevertheless have tactical uses in the scale of battles represented by WK. May be armed with Javelins, (Self) Bows or Slings. Javelin armed skirmishers are slightly more aggressive than their missile oriented cousins who rely mostly on the effectiveness of their slings and bows rather than getting up close and personal in combat.
 .
Massed Archers: Concentrated archers more resilient than skirmishers but not as tough as Spearmen or Tribesmen in combat. Typical of Elamite armies or later period Akkadian or Sumerian armies. Nearly always unprotected but able to deliver greater volumes of fire than any other foot troop type in the game.

 .

Unit Ratings

The following table gives the basic troop stats for the various troop types. Within each army list the actual troop stat line is given specific to each army – see below for examples. For the most part this will be the same as those in the table but some variations account for specific troop weapon and equipment combinations and will possibly be different. In this way each army will be ‘properly’ portrayed and have its own character. Note, these ratings are not set in stone. If you wish to change, (as I may very well do!) to suit your own perceptions or game balance requirements then please do so…they are given here as useful start points that balance the relevant troop types.

Unit Type
Move
Bravery
Aggression
(& Missiles)
Protection
Cohesion
Notes
Army Points
Household Foot
2
10
6
6
6
5
Battle Carts
4
9
5 (3)
6
4
Javelin 2BW range
5
Straddle car/Platform Cart
4
9
4 (3)
5
4
Javelin 2BW range
4
Royal Guard Axemen
2
9
6
5
5
5
Ordinary  Axemen
2
7
5
5
4
3
Ordinary  Spearmen
2
7
3
5
4
3
Levied  Spearmen
2
6
2
5
3
2
Fierce Tribesmen
2
9
6
4
6
Uncontrolled 3BW
5
Wild Tribesmen
2
7
5
4
5
Uncontrolled 3BW
3
Massed Archers
2
7
3
4
3
Bow 4BW range
3
Javelinmen
3
8
(6 for Morale)
2
4
2
Javelin 2BW range
1
Slingers
3
8
(6 for Morale)
1
(2 for Missile)
4
2
Sling 4BW range
1
Archers
3
8
(6 for Morale)
1
(2 for Missile)
4
2
Bow 4BW range
1
Priests
1
6
1
3
3
May not use LPs
3
Stampede (cattle/sheep/pigs)
3
10
As foot skirmishers. Uncontrolled 3BW
2
War Dogs
3
10
5
4
3
As foot skirmishers. Uncontrolled 3BW
3
Fanatics
3
12
7
4
3
Uncontrolled 3BW +1 Agg into contact Skirmisher 1LP/turn
5
 Note – Units marked with an Aggression rating in (brackets) use this rating for missile fire only.

Army List samples

Using the guidelines above here are two army lists to see how these definitions apply to two armies of the period. The first is the Dynastic Sumerian army and the other is the Zagros Mountain list used to create armies of Guti, Lullubi and Hurrians. Other list will follow.
 .
Dynastic Sumerian 2700 BC to 2334 BC
Troop Type
#
M
B
A
P
C
N
AP
Ensi, Lugal, King in Battle Cart
1
4
10
5 (3)
6
5
Javelin 2BW range
5
Army Standard
0-3
Battle Standard
3
Gish gigir 4-Ass Battle Carts
0-3
4
9
5 (3)
6
3
Javelin 2BW range
5
      – exchange for 4-Ass Straddle Car / Platform Cart
0-1
4
9
4 (3)
5
3
4
Erin summa city militia Spearmen
2-7
2
6
2
5
3
2
      – upgrade to Ordinary
0-2
2
7
3
5
4
3
      – exchange as Royal Guard Axemen
0-1
2
9
6
5
5
5
Nim Archers
0-1
3
8 (6 Mor)
1
4
2
Bow 4BW range
1
      – change all to Mari as Massed Archers
0-1
2
7
3
4
3
3
Mercenary Archers
0-1
3
8 (6 Mor)
1
4
2
Bow 4BW range
1
Nim Slingers
0-2
3
8 (6 Mor)
1
4
2
Sling 4BW range
1
Nim Skirmishers
1-3
3
8 (6 Mor)
2
4
2
Javelin 2BW range
1
      – upgrade as Ordinary
any
3
8 (7 Mor)
2
4
3
2
Martu (Amorite) Wild Tribesmen
0-1
2
7
5
5
5
Uncontrolled 3BW
3
      – change to Skirmishers
any
3
8 (6 Mor)
2
4
2
Javelin 2BW range
1
Guti or Lullubi mercenaries Wild Tribesmen
0-1
2
7
5
4
5
Uncontrolled 3BW
3
Special Rules:
  • Do not reduce the army’s aggression level because of the inclusion of Levied Troops.
  • 2 pieces of terrain when defending.
  • 0-3 Strategies and Tactics: Ambush, Assassination, Big Shields*, Champion’s Challenge, Experienced Warlord, Lugal (Imposing Horsemen), Loyal, Beer (Mead), Pike, Priests (Monks), Stampede, Swift Deployment, Veterans.

*Only Spearmen can use the Big Shield tactic.

 .

 .

Zagros Mountain – Guti, Lullubi and Hurri 2350 BC onwards
Troop Type
#
M
B
A
P
C
N
AP
Warlord or Chieftain
1
2
10
6
6
6
5
      – mounted in Battle Cart
4
10
5 (3)
6
3
Javelin 2BW range
5
Fierce Tribesmen – ‘Retainers’
0-2
2
9
6 (3)
4
6
Uncontrolled 3BW Bow 4BW range
5
Wild Tribesmen
3-8
2
7
5
4
5
Uncontrolled 3BW
3
      – arm with axe
0-1
2
7
6
4
5
Hurled Weapon
4
Levy Massed Archers
2-10
2
6
2
4
2
Bow 4BW range
2
      – upgrade to Ordinary
0-2
2
7
3
4
3
3
      – change any to Levy Archer Skirmishers
any
3
8 (6 Mor)
1 (2)
4
2
1
      – change any to Ordinary Archer Skirmishers
any
3
8 (6 Mor)
1 (2)
4
3
2
Levy Slingers
0-1
3
8 (6 Mor)
1 (2)
4
2
Sling 4BW range
1
Akkadian-Sumerian city militia Spearmen
0-5
2
6
2
5
3
2
Special Rules:
  • Tribesmen may cancel one hit from fire or combat per turn for free.
  • Tribesmen armed with Axe gain the Hurled Weapon tactic at no cost.
  • 3 pieces of terrain when defending.
  • A Warlord or Chieftain in a Battle cart may only be taken if Akkadian-Sumerian city militia Spearmen are also taken.
  • 0-3 Strategies and Tactics: Ambush, Assassination, Big Shield*, Champion’s Challenge, Dismount, Experienced Warlord, Hurled Weapons**, Loyal, Beer (Mead), Priests (Monks), Swift Deployment, Veterans, War Dogs.
 *Only Akkadian-Sumerian Spearmen can use the Big Shield tactic.
 **Only Wild Tribesmen can use the Hurled Weapon tactic.

 .

 .

Rule Adjustments?

To ensure we capture the spirit of the Sumerian Wars we need to make sure we don’t just change a few names around and call it something it is not. To that end I have made a number of rules adjustments (thus far), beyond the obvious need to change unit names and stat lines, to ensure we feel that things are a bit closer to 3rd millennium BC warfare than Arthurian combat. I have included notes below each rule adjustment to explain the thinking behind it.

 .

Warrior Kings Rules Adjustments

General Notes – Each army list indicates the allowed Strategies and Tactics as per DB. Note that the trait Javelins is ignored in Warrior Kings as the unit stats incorporate this into the game. Chariot and Levied Troop rules apply however use the stat lines and notes as per their army lists. All optional rules are used in Warrior Kings or as noted in each army list and the battle carts notes below. Units marked with an Aggression rating in (brackets) use this rating for missile fire only. Follow the use of Allies when forming an allied contingent in your army. All these rules can be downloaded in this document.
.

Terrain – Ignore the terrain feature Hedge, it is not used in Warrior Kings.

This one is obvious!

Big Shields – count 6 Protection if contacted to the front only, otherwise protection is 5. Suffer a -1 to their bravery test (for movement) in terrain, except in villages. Cost is 3 points if five or less units so equipped, otherwise 5 points.

This trait may be taken to give armies the use of the large shield so typical of Sumerian and early Akkadian armies. Players may define their units as they wish and in this way we can differentiate between those troops who have a moderate level of protection and those troops who have a genuine large shield giving them the effect of a proto phalanx shielded formation…this is most clearly shown by troops equipped with armoured cloaks vs those with the large ‘front rank’ nine-boss shields. Big Shields provides the best level of protection to a unit engaged to its front but its size and defensive nature precludes the effective use of the shields in the initial contact in an attack (this is shown on the playsheet – see below).

Pike – count -1 in combat when fighting Pike. Pike fight less effectively (-1) when fighting to their flank. Pike may not be combined with Big Shield tactic. Cost is 3 points if five or less units so equipped, otherwise 5 points.

There is some conjecture as to the use of the long spear or ‘pike’ used by Sumerian and Akkadian troops. This tactic allows a player the option to equip his infantry as long spear infantry fighting in the style of a ‘proto phalanx’ with ‘pike’, or equppied with a thrusting spear and shield more akin to a classical Greek hoplite phalanx…the choice is the players. The two handed use of the long pike precludes the use of the Big Shield tactic – you must choose one or the other.

Battle Standard – if equal to or less than 5BW from a battle standard a unit may re-roll a bravery test when required to do so.

Armies of this age would conceivably have used pagan icons of religious significance to motivate their troops – we do know they carried standards of some sort. This tactics enables a player to gain a benefit from its presence on the battlefield.

Battle Carts – Sumerian battle carts function as riders for all rules purposes using the stat line as given in appropriate tables. They can fire their javelins all round. When grouped 4-wheeled battle carts cost 2BW to about face.

Battle Carts are a bit tricky. The two schools of thought on their use is that they were simply vehicles for the carriage of important people and the other is that they had a combat function. I believe they were of latter type. This is a long discussion in itself and too involved to go into here. If you think they are of the former type then simply ignore their inclusion in the army lists except for leaders. If the later, then in Warrior Kings they are portrayed as being a relatively maneuverable missile platform with an offensive combat capability against unsteady foot or other carts….all of this is coupled to them being somewhat brittle.

Leadership Points in Defence – for each LP used to cancel hits, roll 1d6 needing a 4+ to be successful.

This is an optional rules but we feel that with a preponderance of shieldwall armies and the ‘certainty’ of cancelling hits this takes something away from the game….it really does favour the defence. We use this rule, others might not like it and it actually adds another nice decision point in the game adding a bit of tension..

Skirmishing – any Skirmisher or Battle Cart unit may delay their movement in the turn sequence until all other troops types have moved. If they wish to move such units take their bravery test with a -2 modifier, skirmishers first, then battle carts.

One thing we have noticed in DB is that it is hard to initiate a skirmishing combat without getting pounced upon – this is because javelin armed skirmishers and battle carts move before shieldwall and tribesmen troops, thus any of these unit types that moves to within 2BW of any enemy can be charged in the turn before they initiate skirmishing and before they get a chance to fire or use leadership points they have left. Therefore this rule allows a player to initiate skirmish combat by delaying their turn, shooting next turn and using leadership points to prevent being ‘move interrupted’ in the following turn….this seems a better sequence of troop interactions. We are still playtesting this one so it may or may not survive the cut!

Favour of the Gods – whenever you roll a bravery test for a unit and a ‘double score’ occurs you must pull a ‘favour of the gods’ card. Play immediately or later, but if unused discard at the end of the turn. God cards overrule any other rule in the game….the gods do as they please!

This is an important part of the game in my view. It is a key element that makes WK specific to this time period. The Sumerians were religious people believing in the many deities from the Sumerian Pantheon. Wars were fought in their name and great deeds or acts were attributed to these ‘higher beings’ – they were a central tenant of Sumerian society. They add a lot fun and a good deal of narrative to the game that helps remind you of the era in which you are playing. The ‘god cards are shown below (you can download them here) – note the bottom four cards are ‘bad cards’ and the other twelve are ‘good cards’….the gods can be fickle!

 
An
Anu is the sky god. He is the supreme ruler of all the gods.
 
(Add +3 LP to your hand)
 
Enlil
Ellil (Enlil)
Enlil is so powerful that the other gods can’t even look at him.
 
(Add +2 LP to your hand – cancels all other god cards for the turn)
 
Enki
Ea (Enki)
He is a god of wisdom, farming, building, magic and arts and crafts.
 
(Automatically pass any Bravery test)
 
Inanna
Ishtar (Inanna)
Inanna is the goddess of love and war.
 
 
(Add +1 LP to one combat)
 
Ninurta
Ninurta
Ninurta is a god of war. He uses a bow & arrow and a sickle sword.
 
(Re-roll all misses in one missile or fighting attack)
 
Marduk
Marduk
Marduk goes into battle when the other gods elect him as their leader.
 
(Any unit/group does not need to test bravery to move)
 
Shamash
Shamash (Utu)
Shamash is the sun god. He is also the god of truth and justice.
 
(+1 LP)
 
Apkallu
Apkallu fish
Apkallu is a ‘wise man’ or ‘sage’.
 
 
(No terrain effects apply to one unit/group)
 
Anzu
Anzu
 
Anzu is a giant bird who whips up whirlwinds and storms when it flaps its wings.
 
(All enemy units increase their bravery die roll by +2 when moving)
 
Bull Man
Bull Man
The Bull-man helps people fight evil and chaos.
 
(+1 LP)
 
Nabu
Nabu
Nabu was the god of scribes and the patron of writing and wisdom.
 
(Add +1 to any unit/group bravery test)
 
Gula
Gula
Gula was a goddess of healing.
 
(remove 2 cohesion hits in total from any units)
 
Lamashtu
Lamashtu
Lamashtu is an evil demon who preys on the unborn.
 
(Give card to Opponent. Add 1 cohesion hit to two enemy units)
 
Erishkigul
Ereshkigal
Erishkigal stripped Inanna of her power in the underworld.
 
(-1 LP Opponent chooses)
 
Tiamat
 Tiamat
Tiamat is an angry goddess, who decides to destroy the other gods.
 
(-3 LP Opponent chooses)
 
Nergal
Nergal
Nergal uses fevers and plague as weapons.
(Give card to Opponent. Add +2 cohesion losses on one enemy unit)

.

b37ea-71-024

.

Unit size and scale

The scale of Dux Bellorum is provisionally given as one unit equals sixty men….a number very pleasing to the sexidecimal Sumerians! Off course as Dan says this is used mostly as a guide to give players a sense of the scale of the battles being fought. With the miniature unit sizes I envisage using I’m going to increase this to 1 base equaling 120 men and 1 unit of carts representing 12 wheeled vehicles and their associated support infantry runners. This fits in with a 5-7 unit army of WK equating to about 600 men or so supported by battle carts – a common size raiding or small battle force of the time.
 .
One of the appealing aspects of Dux Bellorum is that it allows for a great variety of unit sizes as the game is a ‘base width’ system. Units can be as small as 2 of my standard 35mm square bases joined together side by side to form one unit, or for a ‘massed battle’ I can combine 8-10 infantry bases to form a unit, deployed in two ranks – nice and chunky which I prefer. For Battle Cart units and Generals I’ll use 2-4 of my standard 70mm x70mm bases respectively. The essence of DB is that it is not an ‘element to element’ game like DBA so this seems less critical to my eye and a bit of latitude may work out OK without ‘breaking anything’….at least that’s the way it appears at this point!
 .

Base Width size?

The typical game size recommended in DB is 20BW x 15BW. This gives a 120mm x90mm table when each base is 60mm wide. If we were to simply scale this up to accommodate our unit base width of 4x35mm=140mm, we’d end up with a table 2800mm x 2100mm…that’s a very big table! I actually prefer units a bit wider so that makes for an even bigger table! Given that most armies of this period have a limited mounted capability and typically formed up in a linear fashion we can safely adjust the standard base size to achieve the desired ‘linear battle’ effect. To do this we essentially halve the proportional scale and make each base width 7cm…to make it simple, we’ll call it 3″.
 .
With around 8-10 units total that will give a maximum frontage of our the army of about 1500mm ie 5′. This will provide some wriggle room and allow the game to play on a standard 6’x4′. Therefore with a standardised BW at 3″, infantry move 6″ and Battle Carts 12″ per turn – that feels about right. This will provide for a little less free wheeling about of individual units which seems in keeping with the army’s likely limited capabilities. So the result in play is that it produces a mostly linear battle which is the desired effect. As an aside, I have noticed on other blogs those who prefer larger units are adopting a “fixed base width” size as well. My playtest haven’t revealed any game distortions so this would seems to be working out.
 .

The only point worth noting regarding the reduction in BW size to actual units size will be where terrain features are specified in the game that may effect play balance, such as the size of the perimeter wall in the village raid scenario. I may have to adjust the wall size to allow for the much bigger units being used in comparison to the terrain feature (village) that they will be occupying. Using smaller units at standard base widths causes no such concerns off course.

.

Too small for me, but useful for ‘DBA’ style games to get you going.
A nice square base look that has a bit more ‘weight’ than the unit above…not bad.
A good four base compromise for a chunkier ‘linear’ look
The preferred option – this size gives a real ‘unit feel’…scaled at 1 figure to 3 real men!
..now we’re talking!

Markers

I will be using a reverse logic to Dan’s rules when it comes to marking unit cohesion. He places a marker (dice) with each unit equal to their cohesion rating. As the unit takes hits the cohesion rating is reduced. That’s certainly one way to do it. I prefer the reverse order….more losses, more casualty markers. So therefore as I TAKE cohesion hits I’ll mark them up to the limit of the unit’s rating. I’ll be using my friendly ‘vulture markers’ along with some nice nine-boss shields and broken wheels for my battle carts to show the attritional combat effects during play. This should add a nice touch to enhance the battlefield as we go – more vultures behind the unit as the losses mount makes perfect sense really!
 .

For Leadership points I’ll use a suitable markers such as blue ‘lapis lazuli’ tokens to indicate this favoured precious gem representing increased leadership or as I have done in this picture (as an interim expedient) round markers painted the same color as my table which are simple and more or less blend in. Another good idea is to mount single command figures on bases and use these as LPs. That would add a nice dioramic effect as well….there are lots of options here.

Campaign games?

Warrior Kings can be used to fight battles in a campaign context as described above. Using the campaign system in my campaign post we’d need a way to convert wins and losses into the campaign format similar to Bloody Barons. This is done very simply.

When the game is finished count up the points total losses of the winning side and deduct them from the score of your opponeents army point total (32pts) not taking into account your opponent’s points spent on Strategy and Tactics. Consult the table below to determine your level of victory and compute your prestige points.

For example, if you win the game and you have lost a total of 12 points in your army and your opponent had an army made up of 23 points of units and 9 points on Strategy and Tactics (ie 32 pts total), then you deduct your score of 12 from his of 23 = 11. This would result in “A Good Win” for the victor.

 
Sumer/Akkad winner
Non-Sumer/Akkad winner
Victory level
WK
Points diff
‘Stele’ Prestige Points
End of Campaign
Draw
0-3
1d3-1
1d3-1
Marginal Win
4-6
1d3
1d3-1
Win
7-9
1d3+1
1d3
A good win
10-12
2d3
1d3
Slaughter
13-15
2d3+1
1d3+1
Annihilation
16+
2d3+2
2d3

 .

 .

 .

How does all this play out?

OK, so we’ve got all the info above and are ready to play through a game.
.

Scenario – on the banks of the Euphrates, c 2437 BC, a dispute over water rights has broken out once again. The Ur King has sent out a trusted leader, Ensi DuDu, a cousin of the King…. he has plied his men with Beer to increase their aggression. The King of Eridu’s trusted warlord, Gurak of Aza, mustered his men and marched to meet the old enemy. His previous victories makes him an experienced commander with extra leadership ability. Both forces met at a place giving its name to the battle – Black Goat Hill.

The scenario played was ‘Annals’ which is essentially a pitched battle type game. The Men of Ur were the Aggressors and the Men of Eridu the Repellers.

Men of Ur

x1        Ensi Dudu – in battle cart @ 5pts;
x1        Royal Guard Axemen @5pts
x3        Ordinary Spearmen + Big Shields @12pts
x1        Ordinary Spearmen + (including Big Shields) +Veteran @6pts
x1        Slingers @1pts

Strategy – Beer (Mead), Big Shields, Veteran

Men of Eridu

x1        Gurak – in battle cart + Experienced Warlord @ 7pts;

x1        Royal Guard Axemen + Loyal @8pts
x3        Ordinary Spearmen @9pts
x1        Slingers @1pts

Strategy – Experienced Warlord, Loyal, Increased Leadership (@4pts)

Note – for this playtest we did not use the ‘required’ levy units as per the Dynastic Sumerian list- we just wanted to get as close as we could to the standard 32 point game. In the end we played a 29pt game as I was one unit short on both sides….this didn’t really change too much. As I supplied both sides the units were arrayed in single rank.

.

.

The layout of terrain had a non playing town area to the bottom of the picture and included ‘in game’ features of Black Goat Hill and the wood immediately above it.

.

Wasting no time, Gurak the Eridian leader and skirmishers stacked with LPs helps ensure things go as planned!

.

.

A sweeping view of the field.
Gurak’s charge toward Black Goat Hill can be seen in relation to the ‘bending’ Ur line moving to meet the threat.

.

.

.

.

The skirmishers getting 3 LPs gives them a good deal more survivability as their cohesion is only 2…a recommended tactic if your have some spare LPs!

.

.

The battle carts crushed the skirmishers in combat. The combat system reflected the battle carts tactics well.

.

.

One of the better ‘god cards’ – An gave the Ur commander 3 LP to use for this turn.

.

.

An overview shot – you can see the right hand unit from the Eridian force (left side near the temple) has moved to counter the threat posed by the Ur veteran spearmen. The Eridian skirmishers have moved in front of the Ur spearmen and have started to skirmish. With the Ur forces all ‘tanked up’ up on beer they are moving to contact as soon as they can.

 .

.
.

.

.

.
.
Here you can see the Eridian general Gurak has pulled back away from the Ur Spearmen – battle carts and spear tips do not mix! The Ur spearmen now have the wood to their right flank ‘jamming in’ the Ur General’s ability to flank move.

.

.

As often happens, LPs go to the areas that have the most action. Here the Eridian axemen hope to stave of the attack from the veteran spearmen of Ur.
.
.
.
…..
.
.
.
Moving as single units, the battle cart and skirmishers move to position for a front and flank attack on the Eridian spearmen which by now is feeling a bit isolated.
.
.
.
.
.
.
Earlier in the turn the Ur commander rolled a double score on one of his bravery tests. He drew a god card and got Ninurta. This card enables a re-roll of all missed attacks – a very useful card. Suitably motivated, the Ur player drove in hard with extra LPs knowing that he could commit the Ninurta card as well to deliver a powerful attack.

.

.

Despite the Ur spearmen not gaining any charge bonus because they have big shields the Ur player commits all his Lps to attack as he is relying on his protection rating of ‘6’ to absorb any hits. He adds his aggression score of Spearmen (3), Veteran (1), Beer (1) and LPs (2) for a total of 7 attack dice, holding one LP back in reserve for defence.

In reply the Eridian Royal axemen have a score 5 (it should have been 6 actually – but it didn’t matter in the end) and used all their LPs in defense – the best tactic when you have a fair idea you are not going to be able to win the fight….use LPs to minimise losses.

.

.

With 8 attack dice against them and the ability to re-roll misses by using the Ninurta card, the axemen stood little chance. They did however inflict some losses on the spearmen so it was not all a lost cause!

.

.

.

.

On the opposite flank the lone Ur spearman unit is now faced with the potential of an enemy front and flank.

.

.

The main battle lines have still not closed. Both players are seeking an advantage to either flank in an effort to achieve some local superiority. The Eridian player now needs to commit his considerable battleline to ensure he is not rolled up by the veteran spearmen unit and the enemy general.

.

.

On the Eridan left flank all troops attack. The defending spear unit already has two cohesion hits and will be very lucky if it survives.

.

.

On the Ur left flank the veteran spearmen and General unit attacks with a maximum effort. Attacking spearmen frontally with battle carts is a bit ‘iffy’ so the Ur player has commited 3 LPs to try and smash his way through.

.

.

Here you see both flank attacks going ahead as the main battlelines draw closer to one another.

.

.

Attacked by the Eridian General, even with his disadvantage of fighting spearmen to the front, which was combined with the other two support units, the Ur spearmen were defeated…only just however!

.

.

The Ur commander made his General the main attacking unit supported by the spearmen (as they had accumulated 2 cohesion and the effect of the Beer tactic were only one loss away from routing) – the combat resulted in a draw. Both sides remained engaged next turn, however the General in his battle carts is now at a disadvantage having lost his charge bonus.

.

.

The gallant slingers are quite effective charging into a flank. The additional charge bonus and flank bonus of +2 gave them a total of 4 attack dice. The Ur spearmen could only fight back with 1 attack dice….protect your flanks!!

.

.

On the opposite flank the Ur General and veteran spearmen unit attack again, with the Spear unit this time taking the lead (as the Ur player throws caution to the wind!).

.

.

With one last push the Eridian spear unit breaks…..Ensi Dudu taking the credit even though he only supported the attack!!!

.

.

….a feeding frenzy for the vultures!

.

.

…with the Ur Spearmen already carrying some losses they were defeated rather easily as they failed to inflict any losses on the Eridian spear unit to their front.

.

.

At this point the Men of Eridu had lost two Spearmen units and the Men of Ur had lost two Spearmen units and their skirmishers. It was the Men of Eridu however who were in the better position to deliver the killer blow first. The 50% army morale check would be triggered by the loss of 3 units (excluding skirmishers).

.

.

…with little encouragement needed the Men of Eridu drive for the exposed flank of the Ur Spear unit.

.

.

In seeking to swing things his way, Ensi Dudu hit the lone Eridian spear unit but because he did not start his move entirely behind the spear unit front line it still counted as a front attack….no flank attack bonus.

.

.

Not missing his opportunity for glory, Gurak charged through the slingers and slammed into the flank of the Ur Spearmen. As the General in his battle cart was attacking a flank they did not suffer the -2 combat factor vs spear. Thus Gurak had a total of Aggression (5), charging (1), battle carts (1) attacking flank (2), LPs (3) for a total of 12 attack dice…they scattered the Ur spearmen like a flock of birds!

.

.

The Eridian Spear unit held and with the loss of another Ur Spear unit an army morale check was required. The veteran spearmen failed their test and the Men of Ur ran giving up their claim for the Black Goat Hill fields…..victory to Gurak and the Men of Eridu!

..


With that, the battle ended. An excellent play through and it had a distinctly period feel. We finished the game in two hours. The God cards played an important role at select moments but did not dominate proceedings – these add a lot of fun to the game. The interaction of the battle carts and other troops worked well – charging spear frontally was chancy to the point of fool hardy but against light troops or enemy flanks they proved fast moving and devastating…a nice historical effect to my mind. The reduced BW to unit size gave the game a very nice linear feel which I think the pictures show and prevented the ‘furball in a phonebooth’ type effect which I don’t like.

The unit interaction on the battle line and use of the Leadership Points worked really well….this is what sets DB apart. We found that when an enemy charges you, unless you can preempt him it is often best to use your LPs to brace for defense unless he is already weakened and you can go for a killer blow. If you do go defensive and the combat ‘sticks’ you can then go over to the offensive next turn. This had a nice ‘shieldwall clash’ feel to it and made for interesting choices in allocating LPs and unit interaction along the line on what looks to be a static front…nice decision choices, without over doing it.

We have played again since this game with an additional unit per side pushing it up to 32 pts and yet again it gave a very good result – all in all, WK is playing very nicely using Dan Mersey’s rules and I think this will do nicely for the Sumerian Wars when this type of game format suits – thanks Dan!

.

Why Warrior Kings?

Just as Dux Bellorum was the title attributed to King Arthur and captures the very essence of any aspiring warlord of his time, so too the rise of the warrior kingship ideal in ancient Sumer typified the aspirations of warlords of those times. From Gilgamesh to Sargon the Great and beyond, time and again the warrior-king class of Ancient Sumer and Akkad defined the rise, fall and fates of city-states and empires in the third millenia.

 .

.


Painting I – Foot

This post will focus on painting tips, tricks and traps that have gone into producing the figures you see on this blog. It will not necessarily be a ‘how to paint’ guide, just the ideas I’ve used to achieve the results that you see here.


Task

When starting this project I was always going to have to aim for some method of getting through the fairly large numbers of figures required to get the army I wanted. Not everyone will paint as many as I do as I tend to ‘go big’ rather than less whenever I do a project, but speed in painting whilst achieving a good photographable result was and is the aim.
.
I like to take atmospheric shots so the figures must look good under the camera. In this the superb Cutting Edge sculpts as you can tell from the pictures in the blog and elsewhere go along way to getting great looking minis on the table even with the most rudimentary paint techniques. To this end, for this project I am using the Army Painter system as this gives excellent results for these types of armies. By following the steps below you should be able to produce 40 figs in about 4-5 man hours, possibly less…start to finish….ready for basing.


Workspace

This seemingly inconsequential thought is in fact pretty important in my opinion. The workspace I have is comfortable and readily accessible to get painting completed. Ideally if you can get a space where you do not have to pack everything away this works best. I find that even doing just small tasks of 10-20 mins here and there helps break up the ‘paint session’ type mentality that can often be off putting. Four to five of those little 20 min sessions really adds up and also enables you to come to the paint table with good focus for a short period of time for a ‘burst’ of painting. Hours hard at it can lead to sloppy work or at least drain the enthusiasm sometimes or worse still prevent you from starting/resuming painting.  When using the Army Painter Quickshade and turps make sure you have good ventilation – the stuff stinks and can’t be that good for you under your nose for extended periods.
.
The other great helper I find in getting through the lead pile is having a good distraction! If you have a iPad or iPhone you can watch You tube videos or listen to a podcast, perhaps a PC nearby to do a similar thing. This really helps ease the painting sessions and in fact makes them something to look forward to if you hold out for your favourite TV show or podcast to paint and listen to.


Equipment

A VERY well lit paint area or at least a spot light overhead makes a world of difference to getting accuracy in painting. This cannot be emphasised enough. A good selection of paint brushes of similar sizes so that you can jump from one brush to the next to allow the other to dry after having been cleaned is useful. This gives you control of the paint so that it does not run, particularly when you are doing small detail work.


Preparation

After fiddling with a number of ways of setting the figures up for painting I have settled on mounting them on small round bases (washers would work also). I use a tiny bit of super glue to secure them. The figure easily pops off no problem once the figure is finished. Putting multiple figures on a single strip to me actually slows the painting down. It’s much easier to get accurate control of a single figure in your hand and the round base enables you to roll the figure around easily in your hand without touching the miniature. It also is perfect for the final job of ‘dipping’ which is a critical step in the process…mount them singly!


Dynastic Sumerian Armoured Cloak Spearmen
When painting I do it one unit at a time. I find that it’s easier and faster to paint 40 figures than four lots of ten figures…..you get results as well. You should organise the figure in rows on your paint desk by the same type of miniature it is. That way you can produce variation in color of the same type of figure to get a different look into the unit and at the same time you are painting the same miniature so it eases the task once you have ‘learnt’ how to paint that single figure ie you know the easiest way to paint the same detail one after the other, and so on.
.
After having them mounted, I then give them a dusting of white spray paint. Then hit them with Army Painter Barbarian Flesh tone spray. Generally one coat will do it. I then go back and ‘touch up’ areas I missed with a paint brush very quickly and easily. Best to do this rather than spray the figure multiple times as you’ll clag up the detail. This provides the base color for all other colors to go on.


Note the shields based separately and horizontally.
 .
You can actually buy a Warpaint matching color for Barbarian Flesh to get a perfect match if desired. I’ve also used a paint-on color such as Vallejo Beige Red to give much the same tone of flesh color after the army painting dip (goop) is applied. All this then dries rock hard and the task of painting begins. The Army Painter dip is very forgiving and you can mix the odd shade of flesh on a figure with no ill effect – in fact, it can give you some natural shading if done cleverly.


Painting!

The first thing you’ll notice is that there are alot of very natural shades in the figures on this blog. The armies of this period use mostly natural colors and you really can’t go to far wrong sticking to browns, beiges, reds, off whites, etc. For the most part I use the foundry paint system which allows you to use triple shades of the same colors. This is very handy to get variation from the same type of color and as a good example of this you can see the red shields on the Sumerian spearmen following this principle. In this way I use the same triple color to make sure the shields look similar but still different. Once again, the goop will bind and tie all this together. As a guide the goop will darken the figure a bit so using lighter shades is best to allow some natural shading to occur once the goop is applied and it settles into the various folds and cracks in the figure.
.
When painting the figure a good way to do it efficiently is by painting ‘inside to outside’. By that I mean paint anything on the figure that can then be painted over by the next layer up. A good example is the base coat. That is the bottom layer. After that I usually paint the skirt, then the belting, followed by the hair, helmet and the spear last. This means any blemishes can easily be painted over with the next coat further to the ‘outside’ of the figure….this really speeds and eases the painting ‘task’.
.
This is a simple technique that is used by many painters but makes for very fast painting and you need not be too precise in dark recesses on the figure as the goop will naturally fall into those areas. You do however need to be accurate with painting anything that the goop will not hide. For example, make the belting ‘crisp and sharp’ so that the goop will sit in the cracks and the edges that will show your accurate painting. It’s worth the extra effort and you get better at painting the same figure after a while which is one reason to set the figures up in a row by each type, to make you better at this ‘accurate’ painting. Small paint sessions for these detail tasks are useful to hold the concentration.
.

To do the sandals on the figure I simply run a brush with Windsor and Newton Peat Brown into the detail on the figure – easy and very fast. When you goop the figure it will bind it all together and you do not have to do any further work on the feet of the miniature.

Bronze of this period is a color that is often talked about. Essentially there is no ‘exact’ color. It varies depending on the composition of the tin and copper. Anything from a brownish to a shinier color is fine. Polished bronze comes up quite shiny. I like the browner shade and the color I particularly like is the Formula P3 Rhulic Gold (excellent) and Foundry ‘Burnished Gold A’ pot.  Both these colors paint over the flesh base coat color very nicely and take well to the goop. These are my staple bronze colors achieving the desired look after they have been gooped! I use the P3 paint for ‘less shiny’ items and the gold for spear tips…though I do mix them as well! I occasionally use other variation colors here and there just to create variety.


a ‘brownish’ bronze color.


Paint colors that I find that I use alot are highlighted on this chart.


As you can see, the variation in shades of brown and red take the Army Painter dip very well and are in keeping with the tones of this period (in my view). There are quite a few varieties of colors so this helps ensure the units don’t have a ‘cooks cutter’ look, but do have a similar look achieving the desired ‘organised city-state’ force effect look I like.
.
That said, it is good to put in some variation in color other than basic browns, beiges and off whites, etc. I find that the best way to do this is to goop the figure and then paint on the other colors that don’t take to the Army Painter goop technique that well – colors such as blue and Green, purple, etc are good examples. The goop is a shiny surface so mat varnishing the area you wish to paint can help the application of the paint depending on its consistency, opacity, etc – experiment.


Armoured Cloaks – these are some of the easiest and nicest Cutting Edge figures to paint and also some of the most tedious! The basic paint job is very simple as there is no belting on the figure and you can finish the miniature very quickly. I found with the cloak, if you outline the cloak color on all the figures with a smaller brush, you can very quickly go back with a big brush and fill in the open surface of the cloak…very quick and it gives good consistent coverage easily.
 .


When the figure is painted you will have to decide whether you want to go to the trouble of highlighting the ‘armoured bronze disc’ on the coat. I think it’s worth the effort as these are iconic items of the Sumerian ‘look’. They look good on-table and in the pics. To that end I found a way to speed it up and make it bearable. Get yourself a good gold narrow tip paint pen. The type that dispense paint that you write with. After the goop is applied (not before) you dab the tip on top of the armoured cloak discs and your done (be careful not to press to hard otherwise the paint runs) . 
.
Depending on the paint pen you may be able to do this before the dip but will lose the impact as the goop will darken the gold effect.  The cloak discs are very well sculpted and this detail ‘stands up’ ready to be painted on the Cutting Edge figure. Invariably you will make mistakes that you can either ignore or paint over with the coat base color…your choice. Being careful reduces the need for this afterwards. These gold dot on the cloaks are perfect candidates for 2-3 small paint sessions as this job is tedious.
 .
If you prefer a shiny gold effect then you have to put the dots on after the dulcote mat varnishing process. I think it looks best when dulcoted as the effect is still obvious and the texture of the figure all blends in…it’s a personal choice. One of the nice things about making the armoured cloak discs ‘pop out’ like this is that you get to see the fruits of your labour whenever you play as the cloaks face you not your opponent…at least to start with!


Army Painter Quickshade ‘goop’

Now to the ‘easy’ and fun part….gooping! Up to this point the figures look very basic and frankly pretty horrible! No fear, the goop is here.
.
There are three shades of goop available. I use the mid tone shade for overall coverage of my figures and occasionally use the dark shade tone as well. The mid tone has more viscosity and the dark tone has less ie it is more ‘runny’. The dark tone can be useful for areas with fine detail but I find it does darken the figure a bit. I find that the soft tone is not that useful for these armies as the contrast is not enough, but you could try it on some figures if you have very light shaded colors. The mid tone shade is the best quick shade to use.
.
I put the word ‘easy’ in inverted commas for a reason. To get good results that are consistent there is a technique that in my opinion is not the one they advise for normal application of the Army Painter. The normal technique calls for you to dip the figure in the Army painter pot and shake the figure then leave to dry. I do not think that this gives the best results – at least not for these minis.
.

The technique I use is application by brush – nothing scientific here, as many others do the same. It is the best way in my view to get control of the goop when applying it to the figure. One important point to realise from the start is that the goop does ‘harden up’ relatively quickly. It takes hours to dry, but hardens quickly – Important point!I never apply goop to more than 8 figures at a time. By the time I’ve done the last figure the goop will have started to settle on the first miniatures and then comes the important part. I do however do the entire unit at the same time – this is not a long process. Ensure you have set aside 30-45 mins for the unit of 40 figures to be gooped by this method.

 
Freshly gooped spearmen


The ‘trick’ is that you must go back and ‘draw off’ the excess goop that invariably puddles in the crevices in the figures and nearly always at the feet of the miniature as well, which is not immediately apparent when you first apply it. All looks well for a few minutes then it starts to ‘puddle’ – pay attention to get the excess away from the feet and sandal detail. Goop also sits around belting and in the ‘v neck’ area and the small of the back…..all very common areas to pay attention to. These areas are hot spots to go back and draw of the excess goop.

This point cannot be stressed too much as failure to do this will result in unsightly blobs of goop that really detracts from the finished figures. Take note!!

This looks pretty ugly up close! – note the puddling at the base of the feet and at the bottom of the fur cloak.
.
Here you can see I removed the excess goop from the above figure,
but left a bit on the cloak as a ‘fur effect’ – see below.
At this ‘gooping stage’ one of the tricks I use is to keep a pot of turpentine nearby. If you find the goop settling and hardening in a place before you are able to draw off the surplus then by wetting the brush with turps and applying it to the offending goop you will be able to  ‘soften’ and then ‘draw it off’. You can also use this method to draw off goop from items such as bows which has a goop puddling around the hand and then you can ‘shade out’ to the tip where the turps lifts the goop and returns the base color giving a nice blended effect – in this way you are ‘working the goop’ to achieve an effect. These tips can only be done in the single session of gooping, not after the figure is left to harden and drying. So to a degree you do have some control over the ‘goop process’ whilst your applying the stuff that can enhance the final effect. Its all quite painless and I think the best part of the process.
.
After the goop is dry, at least 6 hours but I usually leave them for a day or so to be sure it is absolutely dry, the figure can then be touched up. This step can be left out as small details in massed units don’t always show up, but I like to go back and very quickly touch up spots that may be obscured or covered in such as way that you want to highlight missed or obscured detail. Once again, this is personal taste but I find this ‘last look’ before dulcoting enables small blemishes to be fixed easily and gives the finished figures a nice consistent look.
,
When applying goop to items such as shields one method I use is to lie the shield or figure horizontally so the goop puddles around the bosses on the shields. This works better than the goop running down the face of the shield and puddling at the bottom. When the goop settles, draw off the excess from the flat parts of the shield and let the goop mostly puddle around the bosses. Once the shield is finally mounted and dulcoated on the figure they you can paint the metal bosses. This retains the metallic look of the paint and really makes the bosses ‘pop’ on those lovely big shields and gives an even coat to this large flat surface.


Shields gooped lying flat – I actually bluetacked them to a small stand to make handling them easier.
Another technique that is very useful at this point, before mat varnishing, is to apply washes. The Games Workshop Devlin Mud is a favourite. This can be applied in areas where the goop hasn’t settled and can help even out the less than precise goop method once it hardens. This is great for belting and faces in particular. The wash can be easily worked and because the goop gives a hard shell shiny coating to the base colors the ink is not absorbed into the paint. The result is that the wash doesn’t change the color underneath and if you mess it up it you can very easily ‘draw off’ the offending area with a cotton earbud or paint brush. Inking OVER goop is a good precise way to apply washes.


These figures have been ever so slightly ‘worked’ with a wash around the belting and edging of the skin and sheepskin cloaks.
Note, these are finished figures after having been mat coated.

Yet another technique I use is to apply detailed geometric designs, albeit, quite simple, onto the figure after the goop is applied. Use a normal fine texta pen – .01mm. Similar to the ink, the pen paint or ink flows on the goop surface much more easily and if you make a mistake you can simply wipe it off and start again – you can’t do this if you draw on the paint directly as the ink is absorbed into the paint. This way you can get fairly nice details easily to add a bit of variation to the figure, but in a painless way. Ensure this detail is completely dry before mat coating and do not ‘paint’ a mat coating on as it can smudge the pen-paint detail….use a spray mat varnish.

Note the geometric drawn pattern on the figure on the left.

Fur coats feature in this period as Guti cloaks and Amorite shields. These can be tricky. The detail on the figure is slight so you need to be careful not to put too much paint on the figure during the base coat stage. When painting the fur the goop will be used to bring out the detail. So before gooping apply a base coat fur color, then dry brush very lightly to highlight the detail. Apply the goop as normal and then go back and use the ink which is very thin and ‘push it around’ to make sure you bring out the fur detail in the figure. You can also use the natural tendency of the goop and ink to puddle to your advantage by using it to create a ‘fur effect’ also.

Here the ink has been applied after the goop and ‘worked around’ to provide extra shading effects.
.
..and here you see the goop puddled at the bottom of the cloak to create a ‘fur effect’
which naturally settles in the folds and detail.
Experiment with this to get the look that you like. The important thing is to get the ink and goop to sit in the fur detail and bring out a high contrast between the colors so you can see the fur effect. As a last touch up AFTER the figure is dulcoated you can dry brush very lightly to make the fur ‘pop’ that much more. You must do this on the mat surface after dulcoating however as the shiny goop surface will not allow you to dry brush – it just smudges. So for painting fur it is –  paint, drybrush, goop, ink, highlight….these are all easy and not tedious steps.

.

At this point the figure still looks pretty ugly. It’s shiny and looks like it’ll never look any good. Off course you know that’s not the case and the wonders of Dulcote will knock the shine off the figure when you spray it. I find it’s best to spray once from the top when the figures are still on their base, then pop them of their base and spray them on one side and then the other. This should get rid of most of the shine. I haven’t used it, but I believe the Army Painter Anti Shine will do pretty much as good a job as dulcote and cost about half the price so might be worthwhile trying out. I also have a pot of dulcote that I brush into hard to get at areas for a completely ‘flat’ finish.

Finished figures not yet based.


Basing

My basing is pretty simple. The base material I use are metal cuts made of 1.6mm Galv Steel. This is undercoated with a spray can color called yellow oxide, as this is close to my base color. I use a house paint color that matches my table surface and use this to edge my metal bases. Then I apply the paint with a touch of white glue mixed in, sprinkle on some woodland scenic Burnt Grass in patches and then flock with a sand mix that includes small rocks, ballast, etc for texture. 
.
After a few minutes of shaking off the texture, which by now has ‘set’ enough to stick to the base, I run my finger around the edge to get a crisp, sharp edge of flock right up to the base edges – nice an clean! It’s a very simple but effective base method that is fast and blends well with my gaming surface (which is the MKP desert mat). If I’m feeling a touch inspired I’ll add some Silfor type grass effects, but not always.
Step 1 – house paint plus PVA – leave goop around feet for a contrast.


Step 2 – Burnt Grass course texture liberally ‘dumped’ on the base…then shaken off.


Step 3 – sand mixture ‘dumped’ over the lot, shaken off.
So there you have it, my method for painting figures as you see them on this blog. Quick, fast, and well protected from damage. The importance of the sculpt you work with makes quite a difference as the goop highlights all the good and bad things about the sculpt you use.
 .

Good luck!

.

.


Campaigns

 .

 …”then, from the Lower Sea and along the Tigris and Euphrates to the Upper Sea, 
the god Enlil put their routes in good order for Lugalzagesi’s armies to march.
From east to west Enlil permitted him no rival; 
under him the lands rested contentedly, 
the people made merry, 
and the suzerains of the cities of Sumer,
and the rulers of other lands along the Tigris and Euphrates,
conceded sovereignty to him, 

Lugalzagesi at Uruk….”

…The campaigns and conquests of  Lugalzagesi of Uruk….

.


It may seem odd to put up a post describing campaigns this early in the project. However, there is method to the madness! First up, there are no doubt others out there who already have troops, so a post that allows them to use some of my ideas and thoughts on campaigning will provide immediate usefulness to the project blog beyond my own exertions creating forces and possibly spark a bit of activity in others! Also, it gives me some structure and ideas in formulating the troops I might need to add to my force as well as the scope and variation of games that can be played, as I can see how all these armies might be used together. This will be helpful to give me ideas and thoughts around possible uses of the troops I collect. Lastly it highlights just how much the period has to offer for people considering collecting their own armies and the possible use of them for an individual or group project.
 .
Campaigns in the Age of Sumer and Akkad offer plenty of good gaming opportunities. From the squabbles of city-state clashes to the expansive military conquests of the Sumerian and Akkadian empires, there’s plenty of fun to be had.
 .
Campaigns are often the best way to get some ‘backbone’ into your games. Unfortunately they often fizzle out or never get started because they are too hard to manage, go for too long or in some way are to difficult to run for any length of time.
 .

This is a shame as our period is ideally suited to campaign games. The nature of the real campaigns waged by the priest-kings, warlords and demi-gods of the time were often limited in nature. Many campaigns would be little more than a series of battles to determine which side would have the rights of ownership of arable lands or perhaps righting past wrongs between neighbouring cities. These operations were relatively limited in scope and for us such campaigns would resemble a sequence of connected battles. In these types of campaign the warring parties could be from different regions or cultures, however this can provide us with some interesting force variations to mix things up a bit.

These circumstances set the scene for the simplest type of campaign, namely, a clash between two or more city-states vying for control of local resource of land and water. The constant battle between Umma and Lagash or Ebla and Mari typifies these types of ongoing campaigns that were repeated in one form or another by many other protagonists. Similarly, these types of campaigns would also reflect internal regional revolts or wars in lands such as the Zagros Mountains, ancient Anatolia or the Syrian desert with all their internecine tribal squabbles.

 .
There are almost constant power struggles going on in this era so two players with the same types of armies can wage campaign battles regardless of their force make up. Campaigns like this are also good for gamers who have limited resources in troops, opposing players or perhaps troops from just one army, such as a large Dynastic Sumerian army for example, which can be split in half to form both sides. This last option could also appeal to the erstwhile solo player if need be.
 .

A more wide ranging type of campaign would involve different armies and troop requirements. This will provide the most variation in gaming possibilities and is best reflected by the numerous campaigns of Sargon the Great or Naram Sin in the later Akkadian period. The attraction of this type of campaign is that many different troop types can be involved resulting in the battles between City-State forces made up of war donkeys, spearmen and skirmishers, allied to or against tribal ‘warband’ type armies such as those from Amorite, Guti and Makkanite forces and armies with varying troop organisations like Eblan and Hattian kingdom forces including combined tribal and civilised force combinations.

There are a multitude of combinations possible in this type of campaign. This will off course require players to have a more diverse collection of miniatures and might best be explored with one player being the Sumerian or Akkadian king attempting to quell the enemies of civilisation and be crowned ‘King of the World!”

One of the other nice elements of running campaigns off this style is that multiple game systems can be used to generate results as well. For players that like massed skirmish style games these can provide a nice variation to ‘battle’ games, thereby breaking up the types of games played, which itself, adds interest to a campaign. Popular systems such as Studio Tomahawk’s SAGA, Osprey publishing’s Dux Bellorum or perhaps a home grown variant of the recently released Two Fat Lardies rules Dux Britanniarum would do nicely. Inventive players can add the ideas in the scenario suite put forth in the Mesopotamian Notes series in Slingshot over the past few years which provide for all manner of low level operations.

….to war!

If using an alternate game system and players want to use the campaign system I describe below, the the only thing that need be done is that result needs to be converted into the Victory Table as laid out below. This is a good way to get players gaming quickly as their forces build up in size until full ‘battle size’ armies can be fielded.

When planning a campaign often the best or most successful ones are the simplest. Almost any structure to fight one battle to the next with ‘meaning’ is more fun than stand alone games, as varied as they can be. The important point to keep in mind I think is that the aim is to get people building armies, fighting battles and maybe earning a few bragging rights whilst keeping all this sustainable so the campaign reaches a conclusion. As always there is a delicate balance between over simplification and stifling complexity coupled to the individual player’s taste, so ensuring there is a method for adding or subtracting detail to suit individual needs is the key. That’s the driving force behind the ideas for campaign play that I’ve try to follow.
 .
One of the real advantages of using the Bloody Barons Sumerian Wars (BBSW) conversion is that integral to the Bloody Barons system is a pre-game campaign set up that gives variation to every battle – its sort of like a grand tactical campaign ‘sub-system’ that takes care of all the pre battle fog of war, which players can still influence with their game preparation choices. Because all games are set up using a standard points system whereby players choose a smaller or larger army as they desire (or forces allow), it means players can collect their miniature forces to this structured approach and create variation in all their games. In this way building a ‘standard’ army will always give players the troops they need to play the campaign and they can add units as they go to create the variation they desire – this makes creating forces manageable and achievable….a nice fit.
 .
So how can we make a campaign that captures alot of what I’ve been talking about? I propose two approaches that will be relatively easy to set up and administer. There’s nothing mind bogglingly new here but the following ideas of using a mapless and simple-map campaign game will provide some structure to put together a campaign that will work and can be completed. Players should view this is a basis for their own ideas or use them as is…the choice is yours.
 .
Mapless Campaigns
 .
In DASAQ Mike Tittensor gave some excellent ideas for mapless campaigns. Without reinventing the wheel, here are Mike’s suggestions below. There are numerous small tweaks individuals can make to this campaign to suit a players forces, etc.
 .
Rise of Uruk: there is much debate as to how the culture of Uruk suddenly burst upon Mesopotamia towards the end of the Fourth Millennium BC, reaching out possibly as far as parts of Egypt with those dopey little bevel rimmed bowls. It has been suggested that Uruk seeded cultural colonies around the periphery of Mesopotamia to generate a trade web. Possibly. Personally, I don’t think you suddenly dominate the international trade routes by knocking on the city gates and trying to sell cookies. Give the Uruk player a morale bonus of –1D6 and see how many battles he can win. Deduct a VP if he shows any sign of knowing what a bevel rimmed bowl is: the city gods love smart people not smart Alecs.
 .
Early Dynastic Wars: each player picks a city, names it, names his deity and his patesi and then fights battles among each other. First city to 100VPs claims to be King of Kish and can call himself Lu.Gal. If he likes, the winner can create amusing fictional pantheons of how the other city gods are merely the servants in his god’s palatial household. This is pretty much Mesopotamian history from about 2800BC to 2400BC.
 .
Rise of Akkad: the King of Agade gets a zero rank general and two level one generals plus double the allowance of veteran quality units plus about 200 points more than his opponent. The Agade player gets +2 successes on the Attacker roll for each battle. With all this in mind, he must defeat numerous armies to recreate Sargon’s meteoric rise in the 24th Century BC. However, the empire is fragile. At the end of each battle he only recovers 50% of his casualties. His opponent’s army is fully restored. The Agade Player wins if he can get to 150 points (or some other preset figure with experienced players handicapped).
 .
Terror from the Sand: a good one for several players when a vast horde of nomadic wildmen appears from nowhere and sweep down on civilisation. One player gets double the points in barbarians against two city-states. Who will be the eventual winner? Will the civilised states ally against the common foe?
 .
…guarding the king’s war chest….
Simple Map Campaigns
These sort of campaigns I like. The players have a map to follow the fortunes of the respective sides and something to ‘conquer’. The use of a map brings a nice campaign planning element to proceedings with easy to follow updates as fortunes wax and wane between the sides. Use any map, stylised or otherwise. There are two campaigns presented here as an idea. The first is the ‘King of Kish’ campaign and the second is the ‘Four Quarters’ campaign.

King of Kish campaign

This campaign will take the form of a dynastic city-state struggle for the resources and hegemony of Sumer. The opposing players will take on the persona of a king of a city-state whose object will be to defeat opposing cities and their gods, as well as forcing other cities to submit to their will, so that all shall know that you are indeed the true ‘King of Kish’! One key advantage of this campaign is that it only requires troops from one army list.

Each player rolls a die, the player with the highest score chooses which ‘circled’ city he wants to be the patesi off, except Kish (which may not be chosen). His opponent now does the same (circle city – Agade, Isin, Umma, Uruk, Lagash or Ur), the limit of players that may be involved being determined by these cities. Once all players have selected a city, each rolls a die with the highest score declaring an attack against which ever city-state he chooses. Each player rolls and chooses a city to attack per turn.

Each city-state will have a maximum value of 5 prestige points. Each city-state runs a total of 1-5 for each side that fights a battle and wins prestige by being victorious. If no side has prestige points in a city-state its score is nominally zero (0). Kish is worth double prestige points to an attacker if he is the winner in a fight. If the opposing player (playing the defending side of Kish) wins he deducts prestige points for any city the attacker has prestige in, equal to the prestige points earned by the victory (do not double in this case).

When a battle is fought the defending side is played by your opponent. The only army list that can be used in these battles is the Dynastic Sumerian list, or Akkadian if a player has chosen Agade as his city. When determining victory and defeat use the Bloody Barons rules, count each level of victory as one prestige point with a draw counting as 0 points and a Slaughter as 5, etc. For example, if the battle results in ‘A Good Win’ then it counts as 3 prestige points, 6 if it was fought in Kish. These points are allocated only to the attacking side’s city-state – the defending side does not gain prestige for his victory, but does deny prestige to his opponent. In this way only an attacking player can gain prestige points.

To achieve victory, the player at the end of any turn that achieves more prestige points than all his opponents in 4 or more cities will be declared the victor – ‘King of Kish’.

 .

Four Quarters campaign

This campaign will take the form of a king of Sumer/Akkad reaching out to control the lands around him for reasons of commerce, trade and glory. The opposing player will take on the personas of all these ‘unconquered’ peoples whose object will be to resist and revolt against this aggression. The focus is on the Sumer/Akkad player who will use the same army from battle to battle, organised as per his army lists. The opposing side will have different armies to play with. This campaign style would be a good way to have different players commanding the various forces arrayed against the Sumer/Akkad player. The two sides have different aims. The Sumer/Akkad player attempts to gain prestige for his wins, acheinv his goal beofre he ‘dies i his lifetime’ or, as often happened, was ‘removed’ from power. The opposing player’s goal is to hasten the demise of the Sumer/Akkad player by inflicting defeats that reduce the time available for his opponent to achieve his goal.
 .
To get under way players need only supply the forces of a typical Bloody Barons game…that’s it! The map below will do nicely to get things going. I use a mapping program called GameMapr to keep track of events – I’m not sure of its availability but its very user friendly. Any paint program can be used however to achieve a similar result.
Victory – For the Sumer/Akkad player this is achieved when all four quarters, including Sumer, (circles on the above map) are controlled by the Sumer/Akkad player (ie 1 to 5 prestige points). If at any time the central circle (Sumer) is not under the Sumer/Akkad player’s control and none of the four quarters (Mari in the north, the Amorites in the west, the Zagros Mountain tribesmen in the east and the Elamites in the south) are under his control, then at the end of the Sumer/Akkad player’s turn the campaign ends in failure and victory goes to the opposing side (in this way the Sumer/Akkad player will always have a chance to fight the ‘last battle’ to salvage his fortunes).
 .
End of Campaign – the campaign length is determined much the same way as a normal game of Bloody Barons. At the end of a turn (ie one where both sides have had a chance to act) a die is rolled and the score is deducted from the total of 30. If at the end of a turn the score reaches zero (0) and the Four Quarters have not been conquered by the Sumer/Akkad player then victory goes to the non Sumer/Akkad player(s). This will force a decision and players will find that the campaign results in roughly 7 turns…remember the bit about getting a result!
 .
Control of a ‘Quarter’ – each ‘quarter’ (region/area) has a prestige rating of between 0 to 5. This number is achieved by the level of victory in a Bloody Barons game as shown below on the victory table. The Sumer/Akkad player has control if he has between 1 and 5 prestige points. If he loses a battle then the quarter is marked at prestige point level zero (0). Once the prestige point level of 5 is achieved by the Sumer/Akkad player that region falls under his control permanently.
 .
‘Prestige’– Conquering leaders of the time engaged in aggrandizement to trump up their victorious and play down or ignore their losses. Therefore whenever a Sumer/Akkad play is victorious he rolls on the Stele Victory table to determine the amount of Stele prestige points he wins for his victory. The Non Sumer/Akkad player adds the total shown in the ‘end of campaign’ dice roll for the level of victory shown.
Victory Chart
Sumer/Akkad winner
Non-Sumer/Akkad winner
Victory level
‘Stele’ Prestige Points
End of Campaign
Draw
1d3-1
1d3-1
Marginal Win
1d3
1d3-1
Win
1d3+1
1d3
A good win
2d3
1d3
Slaughter
2d3+1
1d3+1
Annihilation
2d3+2
2d3
.

The steps for running the campaign are;

First turn only – the Sumer/Akkad is the active player – he must attack into the Sumer area! The Sumer/Akkad player gets +1d3 additional prestige points if in his opening attack on Sumer. He may use this dice to add to the campaign clock if he loses, or as extra prestige if victorious, thus this dice roll will give him additional prestige points which will improve a victory or mitigate a loss. If he loses his first battle then he must continue to attack Sumer until he establishes control of Sumer before striking out into different regions (obviously this will cut down on the time he has available to achieve his goal).

[Optional Start: King of Kish – Instead of one player being nominated as the Sumer/Akkad player, this option allows for a small ‘play off’ to establish which player is successful at being the Sumer/Akkad player in the four quarters campaign game. Each player fights one battle against another player in the campaign (randomly determined). The player who achieves the most prestige points as the attacker or defender is deemed to be the Sumer/Akkad player. He immediately controls the Sumer area with the prestige points he attained in his battle result. The other players now play the ‘other forces’ in the campaign. In the event of a draw, arrange a ‘knock out’ game, before proceeding with the remainder of the campaign, or break the tie in any agreeable fashion].
Play then proceeds from turn to turn as follows;
 .

1. Both players rolls a die and the highest gets to take actions first. When active, the Sumer/Akkad player declares which region he will attack into, even one he controls if he wishes to further tighten his grip on the area by another victory to increase his prestige (up to the limit of 5). If the non-Sumer/Akkad player is active he must roll a d6 score higher than the current Sumer/Akkad prestige level in the nominated area that he wishes to become ‘active’ and have revolt – a roll of 1 is always considered a failure. Failure results in him passing his turn. Also, a non-Sumer/Akkad region may not revolt unless it has itself been attacked at anytime in the campaign  (which eventually it will be).

Note – the non Sumer/Akkad player never ‘attacks’ out of his area – he only revolts within it).

For example, if the Amorite player had 2 prestige points in his region then he would need to roll 3+ to become active in that area. If he does not become active he may not revolt and his turn will pass.

2. Once the attack has been declared then proceed with a standard BBSW game set up and determine victory conditions as normal. Players may use any troops allowed in their army list for that region to make up forces of 650 or 800 points as desired.

(Dice Battles- players can skip any battle they like by rolling an opposed die roll. Generate three leaders as usual and count any (0) leaders as a +1 drm and any (4) leaders as a -1. The difference in scores is the difference in the level of victory, equal scores meaning a drawn battle and a ‘five split’ on the dice would count as an annihilation. Mark the map as if a miniatures battle had been resolved and move to the next player activation- see example of play).

3. The campaign continues until the Sumer/Akkad player has control of the ‘four quarters’, whereby he is declared the winner. If the campaign clock is reduced to (0) and control of the four quarters has not been achieved, then the non Sumer/Akkad player is the winner – the loser must buy his oppoenent a beer!!!

.

Organising campaign moves and miniature battles

The best way to organise the campaign is that when players meet they should have their armies organised and ready for play…don’t waste time fluffing about by not being prepared…this is the age of organised people’s and a courtesy to your opponent!
 .
So having arrived for play, gone through the game set up and played the game to conclusion as per the normal Bloody Barons rules, the results must be determined. Use the victory chart to determine the prestige points or end of campaign clock number additions to add as per the results shown. Having resolved this, record your detail for the map update and campaign log and then roll a D6 to determine who is the next attacker next time you play. This set up the conditions for the next game.
 .
In between games the active player will decide which area he wishes to attack or revolt in and inform his opponent, arranging a time for the next battle. This will provide each player a chance to prepare his forces for the up coming engagement. On the day of battle, proceed as above, with your army all ready to go. This sequence is followed until victory is determined.

 .

Variations?

All sorts of ideas can be added to ‘flesh out’ this very simple, but structured campaign. It simplicity enables anyone to be involved, even other players outside of your immediate group. Its very easy to keep updates online and as there is no hidden movement which makes managing the campaign easy.

If you wanted to you could even break up each area of your map into sub sections and you could fight mini campaigns within the bigger campaign which might suit players who only have one type of army. You could add ‘terrain cards’ to be added to each area so that extra terrain or terrain changes and choices could be adjusted depending on where the battle was being fought. In the hilly country of the Zagros Mountains there could be the chance of more steep hills and woods for example.

Campaign events could be added through the use of random die rolls or the draw of godly events from a deck of cards. There is no limit to how many ‘fins and wings’ you can hang on to this simple game. The key is that the BBSW rules provide the points based structure to enable a small pre game campaign event sequence to be followed to provide variations that keeps every battle different and interesting. The only limit on a player’s force is the 650 and 800 point game limit and the available forces.

Keeping track of the campaign
When keeping track of the campaign it may be done in the following sequence and recorded directly under the map (as shown below);
  • Map – shows the actions described in the Game Result.
  • Game Result – shows the Turn # – Active player – Action taken – Battle result – Prestige or End of Campaign clock effect.
  • Inscription Text – additional propagandist description as they would be recorded in Imperial Decrees!
  • Campaign Clock – Shows the start campaign clock number – Dice roll to reduce clock – EoC clock addition.
This sequence may be used to keep track of the campaign and no further bookkeeping is required.

So how does this work in practice?

Below is an example of a full campaign played start to finish. This will show you how the game functions, how many battles are typically fought and how the campaign ‘map-log’ can be kept up to date to keep track of things.
.
In the spirit of the period along with a little bit of literary fun (…yes, they actually talk like this!), here the ‘Four Quarter’ campaign After Action Report is told as it could’ve been recorded in the Imperial records. It tells the story from the Akkadian king’s point of view as was the custom of the time. Our King, Lugal-zinanna, is the ‘hero’ of the story. 
 .

For those that may wish to read the ‘inscription’ to get the flow and feel of it all here is the full text of the Epic of Lugalzinanna. You can see the map, campaing log and narrative below to see how the campaign story is told incorporating the miniature battles fought and map moves made.

Below is an example of a full campaign played start to finish. This will show you how the game functions, how many battles are typically fought and how the campaign ‘map-log’ can be kept up to date to keep track of things.
.
In the spirit of the period along with a little bit of literary fun (…yes, they actually talk like this!), here the ‘Four Quarter’ campaign After Action Report is told as it could’ve been recorded in the Imperial records. It tells the story from the Akkadian king’s point of view as was the custom of the time. Our King, Lugal-zinanna, is the ‘hero’ of the story.
.
For those that may wish to read the ‘inscription’ to get the flow and feel of it all here is the full text of the Epic of Lugalzinanna. You can see the map, campaing log and narrative below to see how the campaign story is told incorporating the miniature battles fought and map moves made.

.

.

Epic of Lugal-zinanna

ur_shulgi_by_damnans

 Lugalzinanna, son of Gursim, suckled by the goddess Ishtar, goddess of maidens, of harlots, and of battle,

gave milk and barley and blessed her child declaring him master of his lands,

told him to seek new fields for his disaffected people to farm and build canals.


As his great god commanded,

he attacked the defiler Igigu leading a coalition of cities disgracing their gods, 

but was forced to return to Agade to pay homage to Nusku, the moon god, 

so saying he would return to defeat the usurpers of Ishtar and Nusku’s will.


Igigu led the men of Ur, Lagash, Umma and Nippur in revolt against Lugalzinanna,

even though he was struck by a spear,

his war chariot crushed the enemy underfoot,

so by the blessed virtue of Ishtar,

Igigu ran from the field like a child,

the king claiming the victory for the war god, Ninurta, 

holder of a bow, an arrow, a sickle sword, and mace.


Not content with temple building Lugalzinanna gathered his forces and chased the weakened Igigu,

the breaker of treaties and stealer of fields, canals and livestock,

calling the men of Sumer to his standard, only Ur and Umma answering his call,

he was defeated in battle by the mighty king and was chained and led away for sacrifice.


Not content to live in a land made slave to a princling of the north,

a usurper rose, the ensigal-preist of Larsa,

who brought forth his men of the fields and prayed to the city’s beloved Utu,

but was forsaken and scattered by Ishtar’s suckled child,

he now forever to be know as the “King of the Land”, King of Kish, Lugalzinanna.


With his men rested and their bellies full of dates, nuts and beer,

Lugalzinanna marched north to plunder the merchant men of Mari,

by the grace of Enlil, Ishtar watching from her mountain cloud,

and Ningursu, god of rain casting his battle net,

the men of Mari were defeated and sent running to Ebla and the land of Hatti.


With Lugalzinanna now master of the plain of Mari, its canals and walls,

yet more troubled cities of Sumer defied the natural ruler of the land, 

but for the intervention of the god Ninurta,

god of the south wind, wells, canals, farmers, fertility, 

such rain was brought that the lands flooded,

causing men to cling to their homes cowering under the terror of Ninurta’s mace, Sharur.


No sooner the victory in Sumer,

than the rebel Marianites coerced their Eblan masters to fight,

and so restore order to the Mari city god Dagan, god of storms. 

The great king, Lugalzinanna, marched north, with all his war donkeys. 

His shield and spear battered the enemy, so that he came near to destroying his foe, 

but he bade the Sumerian god Ensi no disfavour,

 so that he would not dishonour his Sumerian allies who fought for the great king

and so he sailed back to Agade to feast with the many gifts from Mari and made merry with his men.


Returning to the city of Mari,

 the Marianites fled before the king’s army, 

so the lord of Sumer marched onto the riches of Ebla, 

where he smote the white rock rich trader-princes, 

cursing their indulgences, 

and treatied with the Hattian lords, who hailed him as their master,

and washed his sword in the upper sea, 

so commanding the king of rivers, 

Euphrates and Tigris, 

all the way to the quays of Akkad.


In triumph, the great king, Lugalzinanna, sailed to his temple at Agade.

There he gave offerings to the temple god, Suhgurim, 

destroyer of enemies, annihilater of the wicked,

for Enlil brought out of the mountains those who do not resemble other people, 

an unbridled people, who are not reckoned as part of the land, 

the Gutians.

The great king, master of the rivers, the city of the white rock, king of all Sumer,

fought a great battle,

and scattered the fierce Guti like a flock of small birds, 

hoping they would not return.


Like a swarm of bees,

the Guti defied the king,

attacking his outposts in his conquered highlands.

From this Lugalzinanna, in a nocturnal vision, 

saw that he would make war on the goat skin people, 

tear down their huts and take away their women,

that he would make their temples shake,

and chase them away into the hill like startled deer…..and so it was!


To the west, the desert dwellers, preyed upon the land,

Lugalzinanna gathered his men from all corners of Sumer,

he came with archers, spearmen, war carts,

and before the might of Ishtar’s offerings,

he smote the Amurru so they never rose again in his lifetime,

so great the victory his captives built five temples in the land of the almighty, 

before the king took his place at An’s side.


What did Enlil, the shepherd of the black-headed people, do? 

Enlil, to destroy the loyal households, 

to decimate the loyal men, to put the evil eye on the sons of the loyal men, on the first-born, 

Enlil sent down Gutium from the mountains to plunder. 

Their advance was as the flood of Enlil that cannot be withstood. 

The great wind of the countryside filled the countryside, it advanced before them,

only the king’s household men stopped them from destroying all in their path.


Still they came,

the mountain roads impassable, brigands, raiders plundered the fields,

desecrated temples and destroyed canals.

The king lamented,

have all the powerful gods, An, Enlil, Ishtar and Marduk,

forsaken the people of Sumer?


Answering his cry,

many crop seasons passed and no more was heard from the Guti devils.

To the land of Elam looked our king,

my king, great bull with splendid limbs, dragon with a lion’s eyes!

His fierce weapons pour forth venom into them like a serpent ready to bite,

his men with spears and subject Amurru hordes,

we descend on the land of Elam,

that they never venture in to the land of Sumer again!


Warrior, fearsome lord, powerful, overpowering, Lugalzinanna,

holder of the exalted sceptre rising above the land,

strike terror and fear into the Elamite peoples, 

their arrows no match for spear and shield,

their nags no match for Sumer battle asses!

May they stay in their land and never return,

lest the god of war descend upon them and strike them down!


In his last days,

Lugalzinanna brought forth all men whom he commanded,

men of Ur, men of Lagash, men of Agade, his war asses and subject tribesmen,

all who acknowledged him as Lugalzinanna,

proud king, enthroned prince, who walks like Utu, brilliant light of the land, lofty in nobility, 

riding on the great divine powers,

favoured by Enlil, beloved by Ninlil,

he does defeat the people of Elam, piling up their dead three cubits high,

taking their lapis lazuli, 30 minas of gold, and 300 minas of silver,

hail the great king, Lugalzinanna!


From this day,

Let no man defile or desecrate any inscription of Lugalzinanna,

lest he be struck down by Enlil,

who shall uproot his foundation and obliterate his progeny,

have his eyes poked out and made mute, so he may not speak of his treachery.


All hail, the king of the four quarters,

Lugalzinanna! 

.

.

 T1a
Turn 1: Akkad – Attack Sumer – Sumer Win – EoC 1d3 (2).

As his great god commanded,

he attacked the defiler Igigu leading a coalition of cities disgracing their gods, 

but was forced to return to Agade to pay homage to Nusku, the moon god, 

so saying he would return to defeat the usurpers of Ishtar and Nusku’s will.

.

.

 T1b
Turn 1: Sumer – Sumer revolt – Marginal Win for Akkad – 1d3 pp (1)

Campaign Clock: 30-3-2=25.

Igigu led the men of Ur, Lagash, Umma and Nippur in revolt against Lugalzinanna,
even though he was struck by a spear,

his war chariot crushed the enemy underfoot,

so by the blessed virtue of Ishtar,

Igigu ran from the field like a child,

the king claiming the victory for the war god, Ninurta,

holder of a bow, an arrow, a sickle sword, and mace.

.

.

 T2a
Turn 2 – Akkad – Attack Sumer – Akkad Win – add 1d3+1 pp (2).

Not content with temple building Lugalzinanna gathered his forces and chased the weakened Igigu,

the breaker of treaties and stealer of fields, canals and livestock

calling the men of Sumer to his standard, only Ur and Umma answering his call,

he was defeated in battle by the mighty king and was chained and led away for sacrifice.

.

.

 T2b
Turn 2: Sumer revolt – Marginal Win – EoC 1d3-1 (0).

Campaign Clock: 25-5-0=20.

Not content to live in a land made slave to a princling of the north,

a usurper rose, the ensigal-preist of Larsa,

who brought forth his men of the fields and prayed to the city’s beloved Utu,

but was forsaken and scattered by Ishtar’s suckled child,

he now forever to be know as the “King of the Land”, King of Kish, Lugalzinanna.

.

.

 T3a
Turn 3: Akkad – Attack Mari – A Good Win – add 2d3 pp (1+2=3).

With his men rested and their bellies full of dates, nuts and beer,

Lugalzinanna marched north to plunder the merchant men of Mari,

by the grace of Enlil, Ishtar watching from her mountain cloud,

and Ningursu, god of rain casting his battle net,

the men of Mari were defeated and sent running to Ebla and the land of Hatti.

.

.

 T3b
Turn 3: Sumer – Sumer revolts – rolls a 2, fails to activate – no outcome.

Campaign Clock: 20-2=18.

With Lugalzinanna now master of the plain of Mari, its canals and walls,

yet more troubled cities of Sumer defied the natural ruler of the land, 

but for the intervention of the god Ninurta,

 god of the south wind, wells, canals, farmers, fertility, 

such rain was brought that the lands flooded,

causing men to cling to their homes cowering under the terror of Ninurta’s mace, Sharur.

.

.

 T4a
Turn 4: Mari revolts – rolls a 4 resulting in a battle – Mari (Eblan forces) achieve A Good Win – EoC 1d3 (1).

No sooner the victory in Sumer,

than the rebel Marianites coerced their Eblan masters to fight,

and so restore order to the Mari city god Dagan, god of storms.

The great king, Lugalzinanna, marched north, with all his war donkeys.

His shield and spear battered the enemy, so that he came near to destroying his foe,

but he bade the Sumerian god Ensi no disfavour,

so that he would not dishonour his Sumerian allies who fought for the great king,

and so he sailed back to Agade to feast with the many gifts from Mari and made merry with his men.

.

.

 T4b
Turn 4: Akkad – Attack Mari (Ebla) – a Marginal Win – 1d3 pp (2). Mari submits to Akkad at 5 pp.

Campaign Clock: 18-2=16.

Returning to the city of Mari,

 the Marianites fled before the king’s army,

so the lord of Sumer marched onto the riches of Ebla,

where he smote the white rock rich trader-princes, 

cursing their indulgences,

and treatied with the Hattian lords, who hailed him as their master,

and washed his sword in the upper sea,

so commanding the king of rivers,

Euphrates and Tigris,

all the way to the quays of Akkad.

.

.

 T5a
Turn 5: Akkad – Attack Guti (Zagros) – a Draw – 1d3-1 pp (1) & 1d3-1 EoC (1).

In triumph, the great king, Lugalzinanna, sailed to his temple at Agade.

There he gave offerings to the temple god, Suhgurim, 

destroyer of enemies, annihilater of the wicked,

for Enlil brought out of the mountains those who do not resemble other people, 

an unbridled people, who are not reckoned as part of the Land, 

the Gutians.

The great king, master of the rivers, the city of the white rock, king of all Sumer,

fought a great battle,

and scattered the fierce Guti like a flock of small birds, 

hoping they would not return.

.

.

 T5b
Turn 5: Zagros – Guti revolts – Akkad Marginal Win – 1d3 pp (2).

Campaign Clock: 16-2-1=13.

Like a swarm of bees,

the Guti defied the king,

attacking his outposts in his conquered highlands.

From this Lugalzinanna, in a nocturnal vision, 

saw that he would make war on the goat skin people, 

tear down their huts and take away their women,

that he would make their temples shake,

and chase them away into the hill like startled deer…..and so it was!

.

.

 T6a
Turn 6 : Akkad – Attack Amorites – Akkad Slaughter – 2d3+1 pp (5). Amorites submits to Akkad control at 5 pp.

To the west, the desert dwellers, preyed upon the land,

Lugalzinanna gathered his men from all corners of Sumer,

he came with archers, spearmen, war carts,

and before the might of Ishtar’s offerings,

he smote the Amurru so they never rose again in his lifetime,

so great the victory his captives built five temples in the land of the almighty, 

before the king took his place at An’s side.

.

.

T6b
Turn 6: Zagros – Guti revolts, rolling 5+ – achieves a Good Win – 1d3 EoC (2).

Campaign Clock: 13-4-2=7.

What did Enlil, the shepherd of the black-headed people, do? Enlil, to destroy the loyal households, 

to decimate the loyal men, to put the evil eye on the sons of the loyal men, on the first-born, 

Enlil then sent down Gutium from the mountains into revolt. 

Their advance was as the flood of Enlil that cannot be withstood. 

The great wind of the countryside filled the countryside, it advanced before them,

only the king’s household men stopped them from destroying all in their path.

.

.

T7a
Turn 7:  Zagros – Guti revolts again, rolling 4+ – achieves a Win –1d3 EoC (+1).

Still they came,

the mountain roads impassable, Guti raiders plundered the fields,

desecrated temples and destroyed canals.

The king lamented,

have all the powerful gods , An, Enlil, Ishtar and Marduk,

forsaken the people of Sumer?

.

.

 T7b
Turn 7: Akkad – Attack Elam – Elam has a Win – 1d3 EoC (1).

Campaign Clock: 7-2-1-1 =3.

Many crop seasons passed and no more was heard from the Gutian.

To the land of Elam looked our king,

my king, great bull with splendid limbs, dragon with a lion’s eyes!

His fierce weapons pour forth venom into them like a serpent ready to bite,

his men with spears and subject Amurru hordes,

we descend on the land of Elam,

that they never venture in to the land of Sumer again!

.

.

 T8a
Turn 8: Elam – Elam revolts, rolling 2+ – achieves a Marginal Win – 1d3-1 EoC (2).

Warrior, fearsome lord, powerful, overpowering, Lugalzinanna,

holder of the exalted sceptre rising above the Land,

strike terror and fear into the Elamite peoples, 

their arrows no match for spear and shield,

their nags no match for Sumer battle asses!,

May they stay in their land and never return,

lest the god of war descend upon them.

.

.

 T8b
Turn 8: Akkad – Attack Elam – Akkad has a Marginal Win – 1d3-1 EoC (2).

Campaign Clock: n/a!

In his dying days,

Lugalzinanna brought forth all men whom he commanded,

men of Ur, men of Lagash, men of Agade, his war asses and subject tribesmen,

all who acknowledged him as Lugalzinanna,

proud king, enthroned prince, who walks like Utu, brilliant light of the land, lofty in nobility, 

riding on the great divine powers,

he who settles the people in the four quarters,

favoured by Enlil, beloved by Ninlil,

he does defeat the people of Elam, piling up their dead three cubits high,

taking their lapis lazuli, 30 minas of gold, and 300 minas of silver,

hail the great king, Lugalzinanna!

From this day,

Let no man defile or desecrate any stele of Lugalzinanna,

lest he be struck down by the almighty An,

have his eyes poked out and made mute so he may not speak of his treachery.

All hail, the king of the four quarters,

Lugalzinanna!

.

So the campaign ends! Sumer/Akkad achieves victory by controlling all four quarters before the campaign clock reached zero only just achieving his goal before the campaign clock ran down. Along the way the campaign generated 15 battles against all different types of enemies – plenty of ‘meaningful’ action.

Whilst achieving success, the relatively tenuous hold of the lands of Elam, the Zagros highlands and internal strife in Sumer do not bode well for the peace of the empire…a reconquista beckons…can you do better!

May the god Enlil be pleased with you!

ancient-mesopotamian-religion-1